Modules
Detail all the features and functionalities of the software or product, including how to use them, any customization options available, and any limitations or constraints.
- Dashboard Intranet
- Guests
- Parcel and Deliveries
- Contacts
- Booking System / Reservations
- Assets
- Units/Areas (With Brochure PDF/Image and Appliances Information)
- Unit Entry
- Parking Stalls
- Lockers
- Wine Storage
- Communications
- Maintenance
- Warranties
- Warranty Activity
- Warranties Dashboard
- Creating a Warranty Status
- New Warranty Claim - Resident's Portal
- Warranty Subcontractor Magic Link
- Creating a New Resources/Subcontractor
- Manager/Admin Guide: Reviewing and Approving or Denying New Warranty Claims Submitted by Residents in the Resident’s Portal
- Assigning Subcontractor
- Adding Trades to a Subcontractor
- Ticket/Warranty Claim Status for User/Resident
- Multiple Warranty Claim - Resident/User Portal
- Administrative Task
- Activity Types
- Contact Types
- Parcel Types
- Address Types
- Relationship Types
- Membership Types
- Preference Types
- Maintenance Types
- Pet Types
- Department Types
- Location Types
- Trade Types
- Warranty Status
- Unit Locations
- Referral Resources
- Sales Representatives
- Ratings
- Reports
- Activities
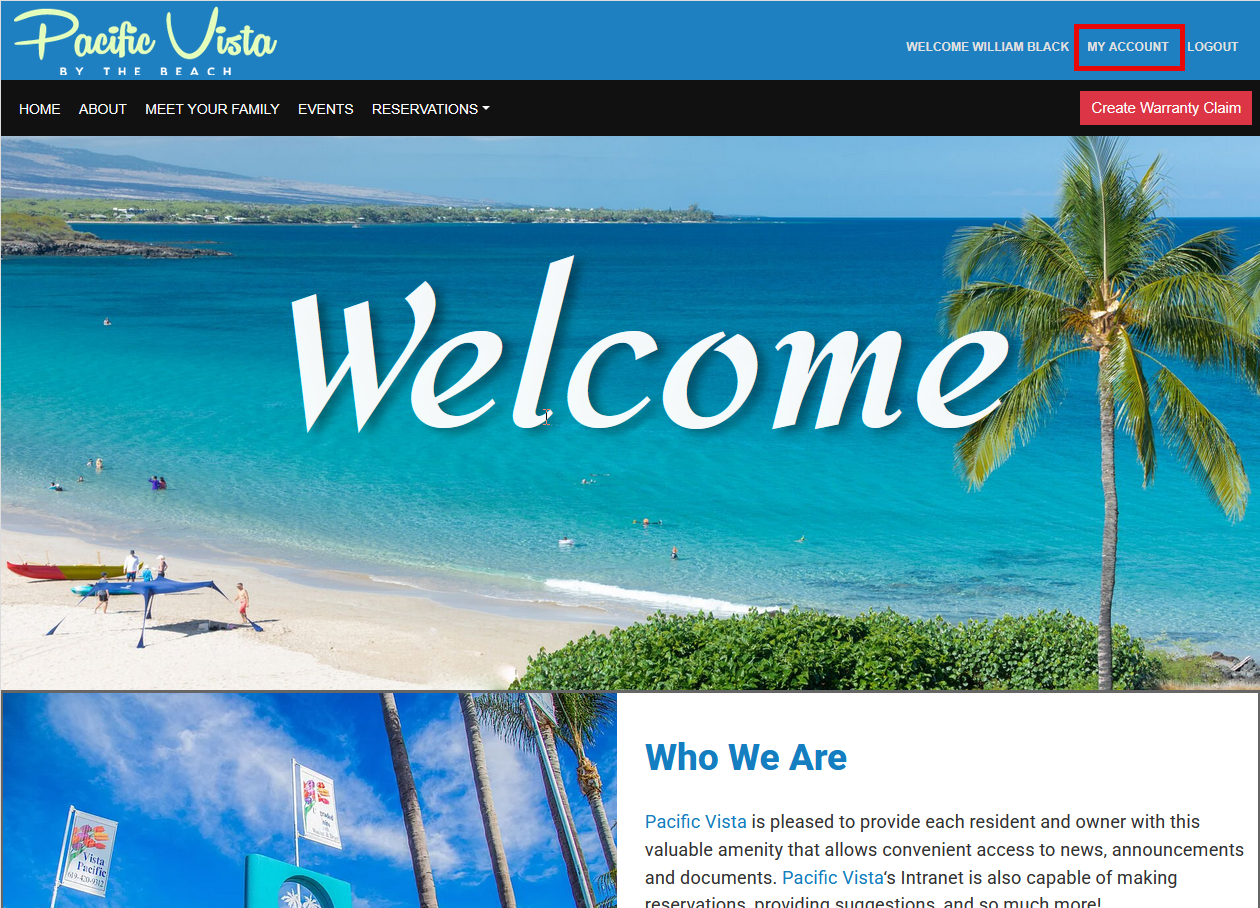
Dashboard Intranet
Intranet Dashboard
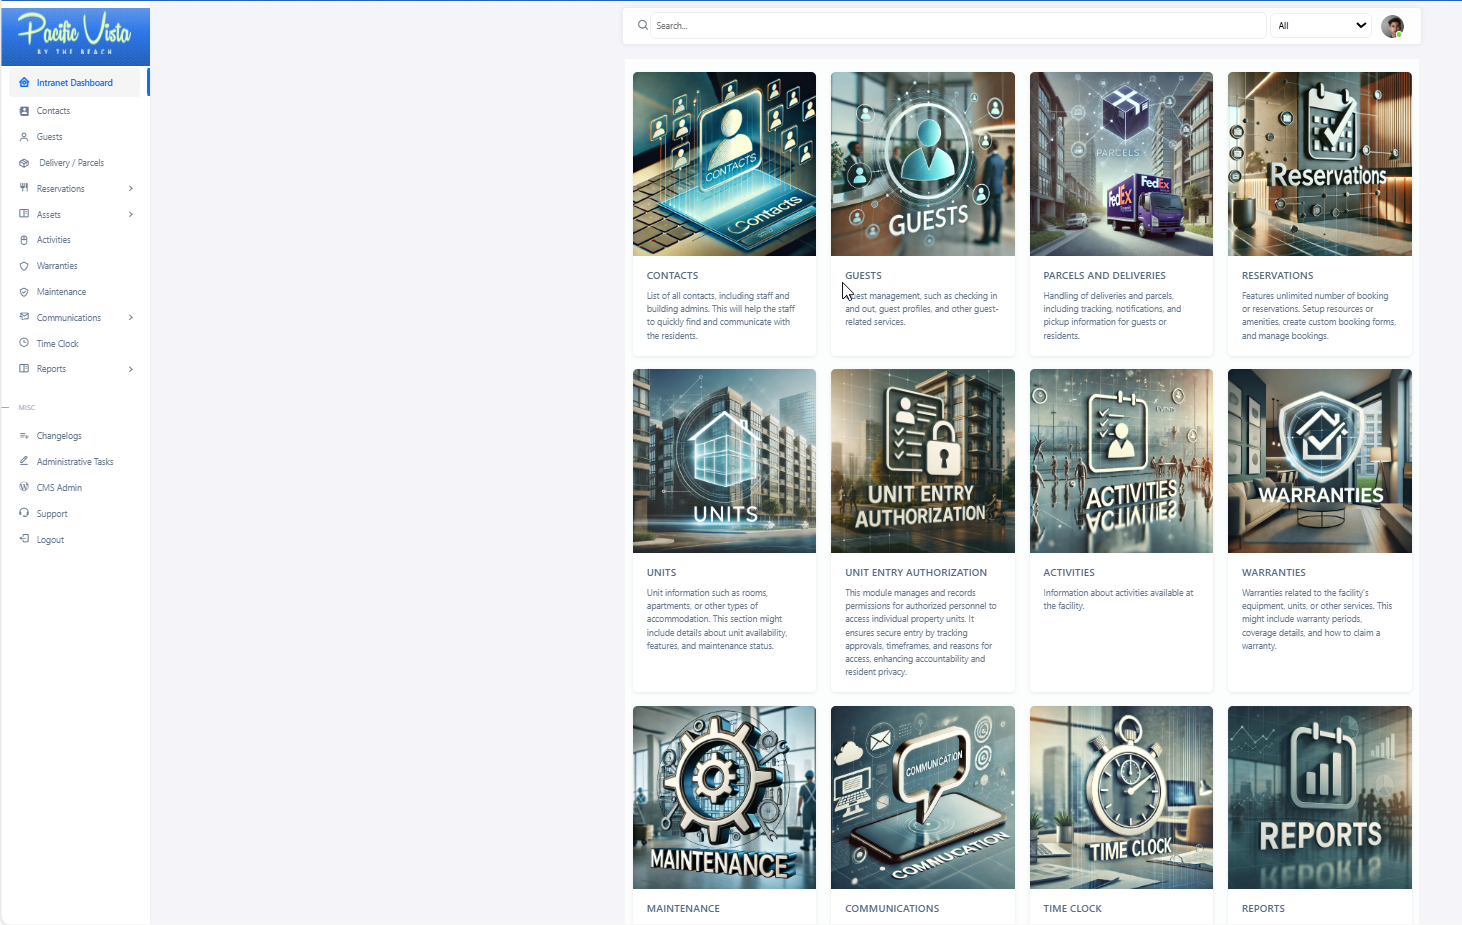
The Intranet Dashboard is a centralized hub designed to streamline facility management and enhance user experiences. Each section offers specialized tools and resources for efficient operations. Here's a breakdown:
- Guest: Tools for managing guest profiles, check-ins, check-outs, and other guest-related services.
- Delivery / Parcel: Handling of deliveries and parcels, including tracking, notifications, and pickup information for guests or staff.
- Reservations: Managing reservations for accommodation or other services offered by the facility. This includes booking, modifying, and cancelling reservations.
- Units: Information about the available units, such as rooms, apartments, or other types of accommodation. This section might include details about unit availability, features, and maintenance status.
- Contacts: A directory of important contacts, including staff, departments, and external service providers. This can help guests and staff quickly find and communicate with the right people.
- Activities: Information about activities available at the facility, such as recreational events, fitness classes, or excursions. This section can help guests plan their activities during their stay.
- Warranties: Details about warranties related to the facility's equipment, units, or other services. This might include warranty periods, coverage details, and how to claim a warranty.
- Time Clock: A tool for staff to clock in and out, manage their working hours, and track their attendance.
- Communications: Centralize communication tools for sending updates, announcements, and important messages to residents, staff, or other stakeholders.
In addition to these main sections, the left sidebar includes miscellaneous options for:
- Reports: Generate detailed reports related to Guests, Activities, Deliveries, Warranties, Contacts, Units, and Pets. This tool helps both users and administrators review key metrics and ensure smooth operations.
- Changelogs: Access records of system updates and modifications.
- Administrative Tasks: Tools and resources for administrative tasks, such as approvals, scheduling, and other backend processes.
- CMS Admin: Content Management System administration for managing the facility’s website and internal content.
- Support: A resource hub where users and administrators can:
- Access Documentation for system features and operational guides.
- Submit feedback via the Feedback Form to share suggestions or concerns.
- Report technical issues using the Bug Report tool.
- Logout: Securely log out of the intranet system.
Each section is tailored to streamline operations, enhance guest experiences, and provide staff with the tools they need to manage the facility efficiently.
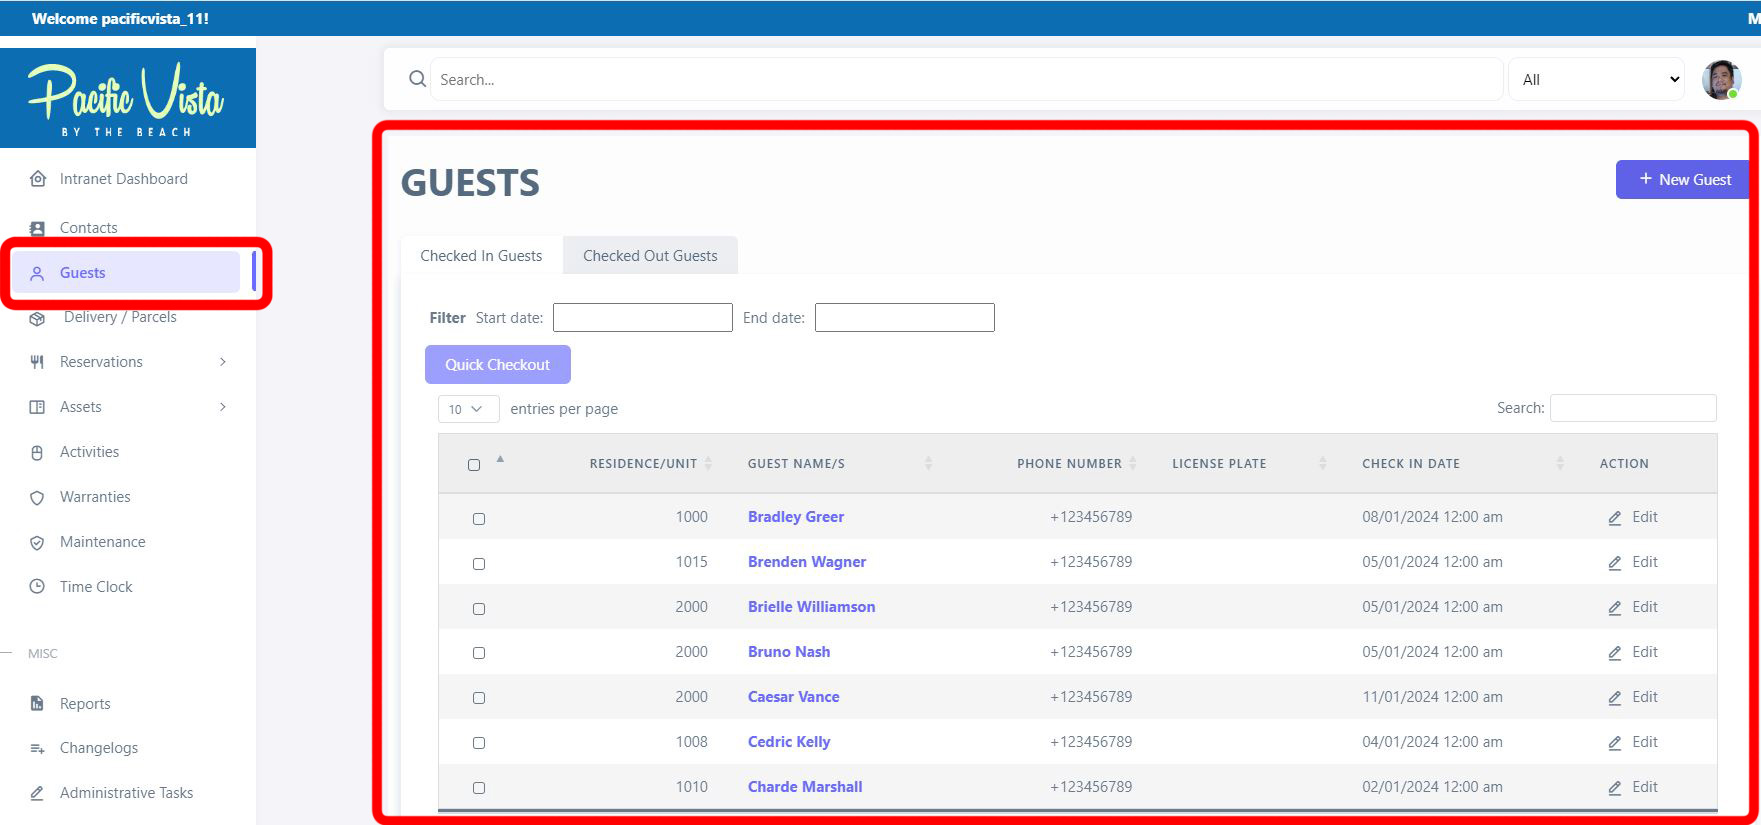
Guests
Overview
Guests are stored as a custom post type `guests`. Each guest record ties a visit to a unit, captures identity and stay details, optional vehicle information, check-in/out times, signature, optional photo, and optional email to the resident. The module supports front-desk style workflows with REST exposure of ACF data where configured.
Access typically requires client admin (or equivalent) and guest_access capability.
How to Create
Information and services related to guest management, such as checking in and out, guest profiles, and other guest-related services.
- New Guest - Ensure all required fields are completed with the necessary information then click "Submit."
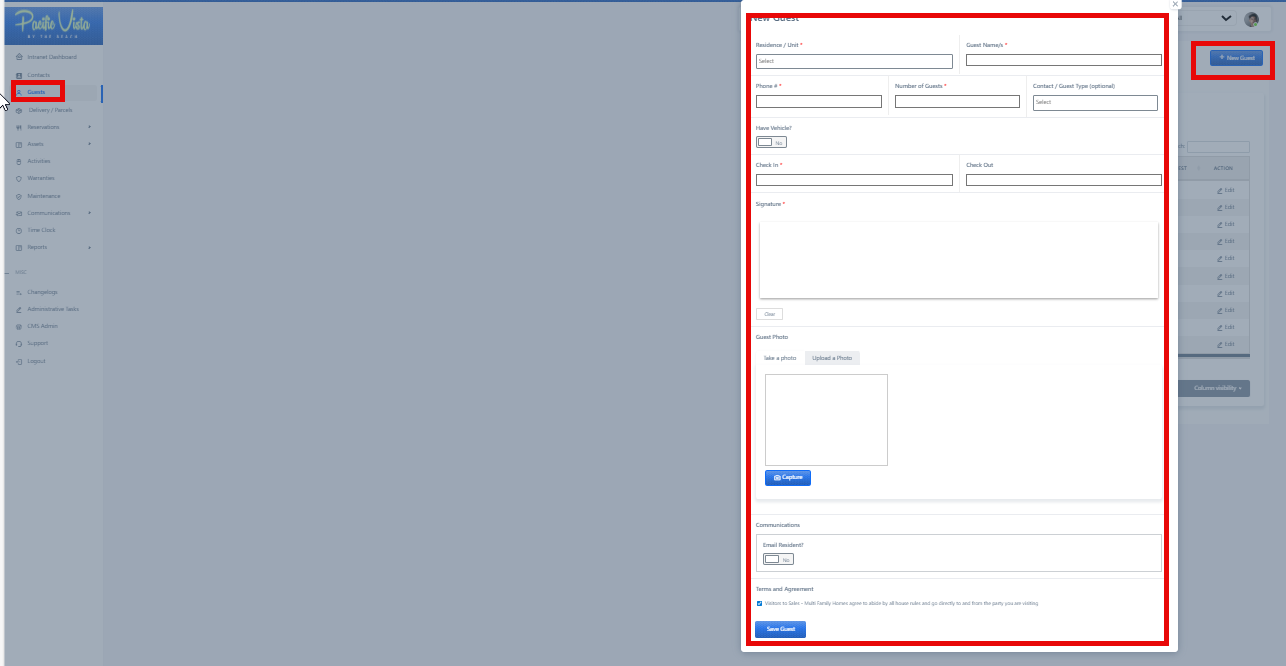
- All Guest - Here you will find all the necessary information for each guest, including their Residence/Unit, Check-in date, Check-out date. You can also view or update existing information by clicking the three-dot icon under "Action."
Parcel and Deliveries
Parcel / Delivery
Handling of deliveries and parcels, including tracking, notifications, and pickup information for guests or staff.
Please find attached the video for the Delivery/Parcel.
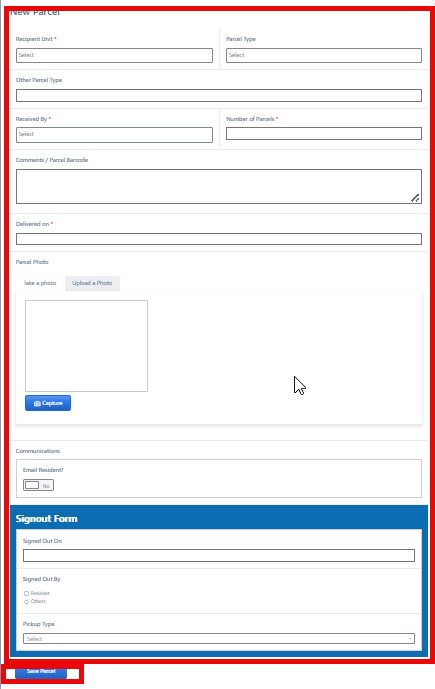
- In the Delivery/Parcel section, you can see the details of each delivery or parcel, including "Recipient Name", "Type", "Status", "Delivery Date". and "Action" options. You can also update or view them by clicking the three-dot icon under "Action."
It can also be categorized based on "In Storage" and" Claimed Parcels".
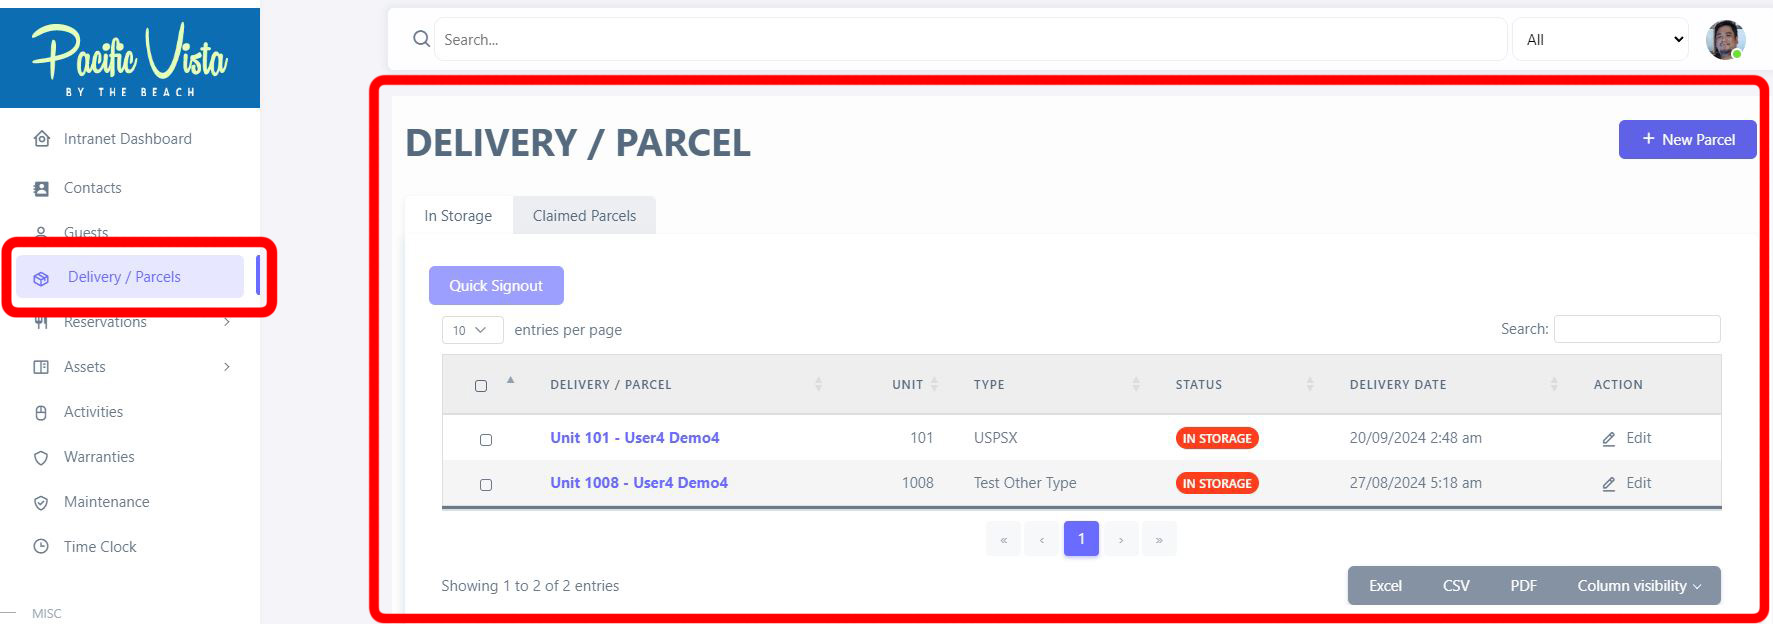
After completing all required details, click “Save Parcel.”
Contacts
Overview
Contacts in CE One Source are **WordPress user accounts** on the subsite (residents, building admins, staff, subcontractors). The **All Contacts** area lists these users; staff use it to register new people, open a contact profile, and manage related records (units, relationships, pets, vehicles, addresses, preferences, and more depending on enabled features and roles).
Access is role- and capability-based (for example `client_admin` and module flags). Some sites use a **Plan Warrantee** variant of the contacts UI.
How to Create
A directory of important contacts, including staff, departments, and external service providers. This can help guests and staff quickly find and communicate with the right people.
Please find attached the video for the Contacts/Accounts.
- All Contacts - Here you can view all user logins for contacts, displaying full names, email addresses, status, date of birth and contact type added. You also have the option to view or edit a contact's profile by selecting the three-dot icon under "Actions."
A “New Contact” button is also available for adding new contacts to the system. By clicking this button, users can input the necessary information to register and manage additional contacts.
It can also be categorized based on Residents, Resources, Staff, and Building Admin.

After completing all required details, click “Register.”

How to Update
Basic field information (New Contact modal)
| Field label (UI) | Purpose |
| Username | Login identifier; must be unique. |
| First Name | Given name (required). |
| Last Name | Family name (required). |
| Email Address | Primary or alternate contact email depending on site rules. |
| Role | Resident User, Building Admin, Subcontractor, Staff User. |
After creation, **unit assignment**, **owner vs resident**, and other data live on **Units** and profile subsections—not on this minimal registration form alone.
Booking System / Reservations
Reservations & Booking System
Assets
Units/Areas (With Brochure PDF/Image and Appliances Information)
Information about the available units, such as rooms, apartments, or other types of accommodation. This section includes details about unit availability, features, and maintenance status.
Please find attached the video for the Unit/Areas.
Please find the attached video for adding information to the Brochure (PDF)
Please find the attached video for adding information to the Brochure (Image)
Please find the attached video for adding information to the Appliances
- New Unit/Area - Simply fill out all necessary information fields and click "Submit."

- All Units - You will find the unit number/unit name, access to view the resident's profile, check the status, and update the unit as needed by clicking the three-dot icon under "Action."

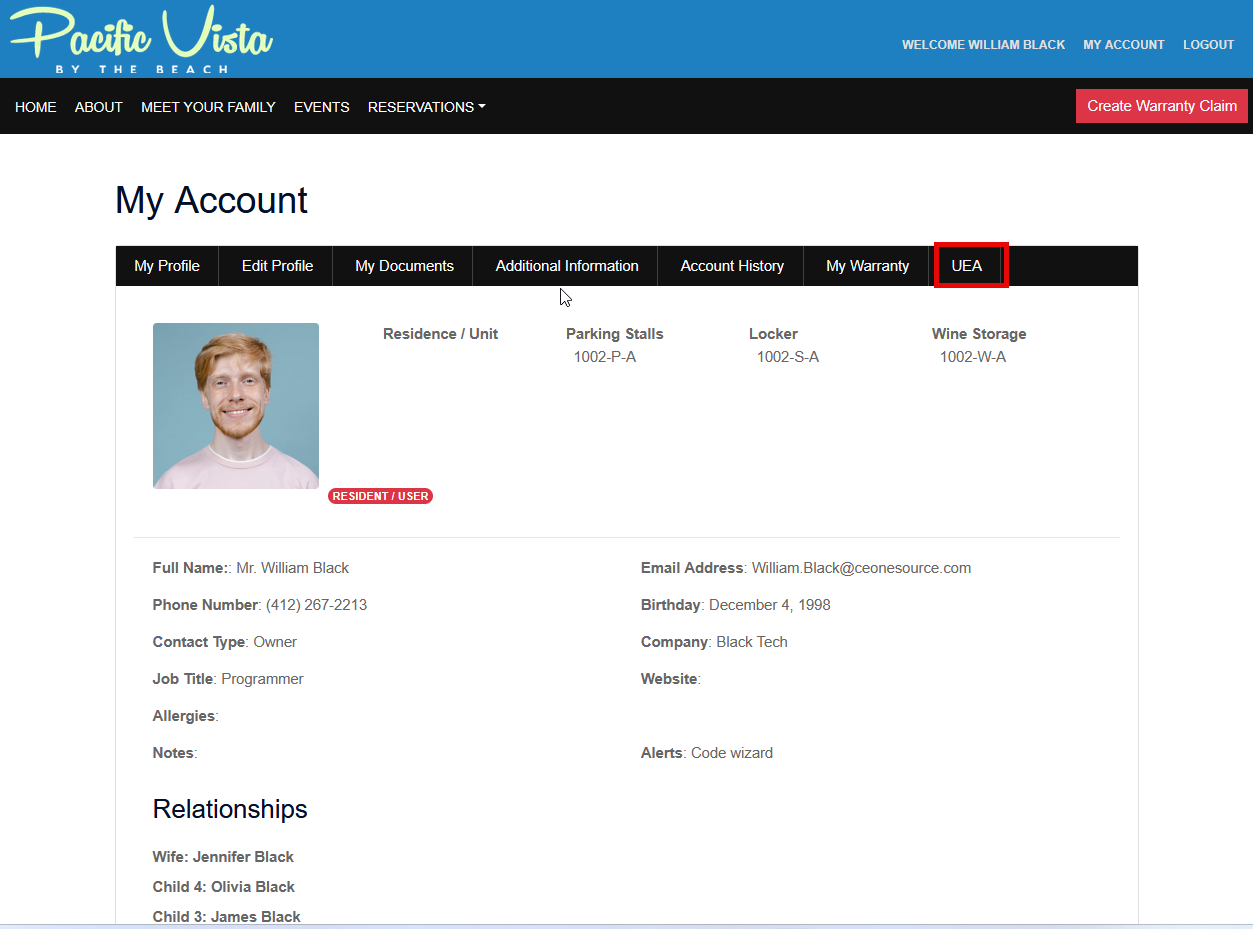
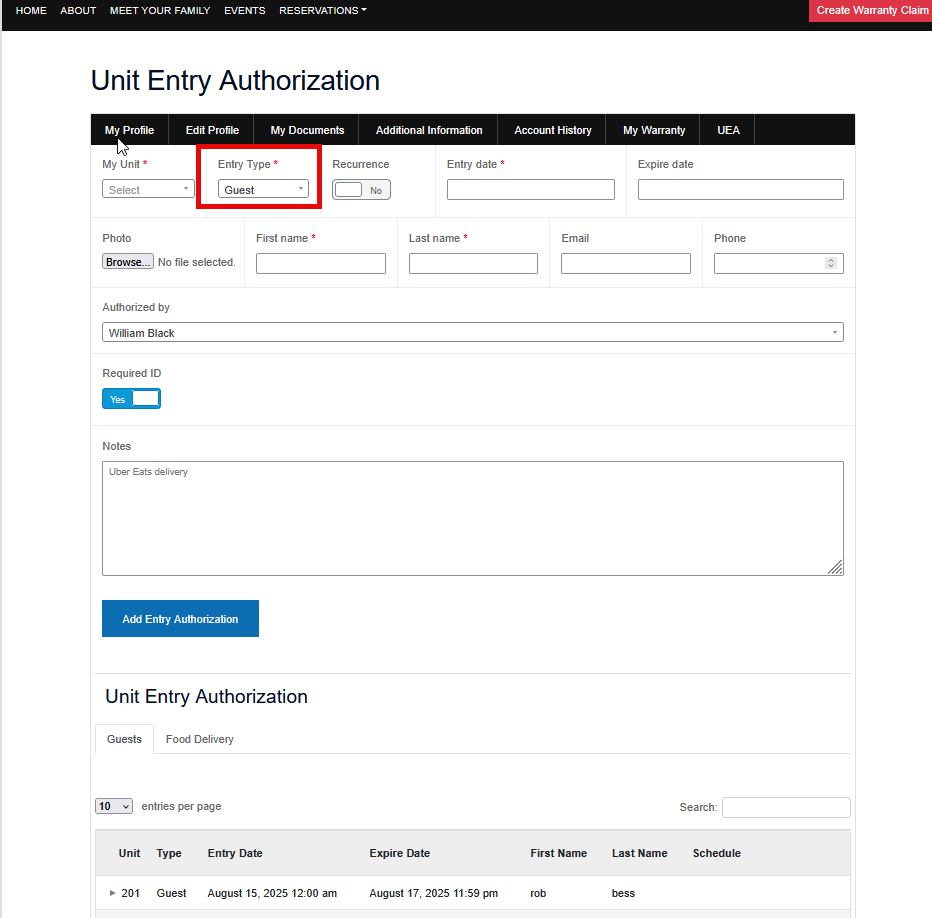
Unit Entry
Serves to outline the access permissions granted to individuals. The purpose of this authorization is to enable selected individuals to carry out assigned tasks or personal matters. May be undertaken in representation of an Admin/Staff member or Resident/User.
- Admin/Staff member - This refers to the part of the system or process where administrators or staff members manage and control the Unit Entry Authorization. (Creating and approving entry authorization. Editing or deleting existing entries, Managing user permissions and roles, Monitoring Entry Logs and Reports).
Please find attached the video for the Unit Entry.
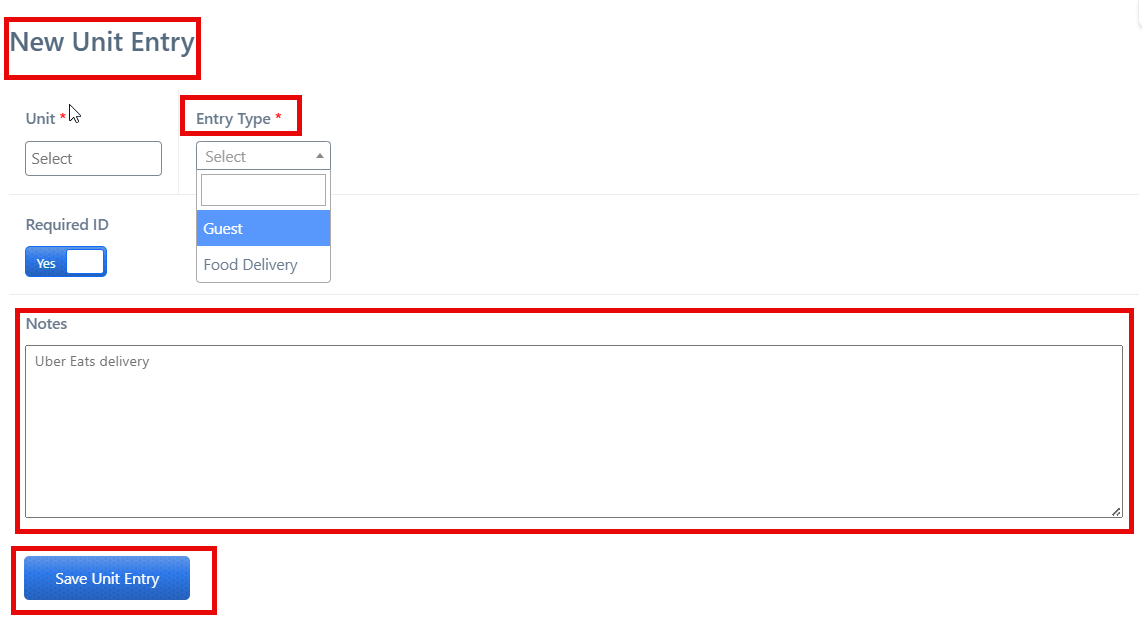
Click on 'Unit Entry,' click on 'New Unit Entry' to add or create a new entry.
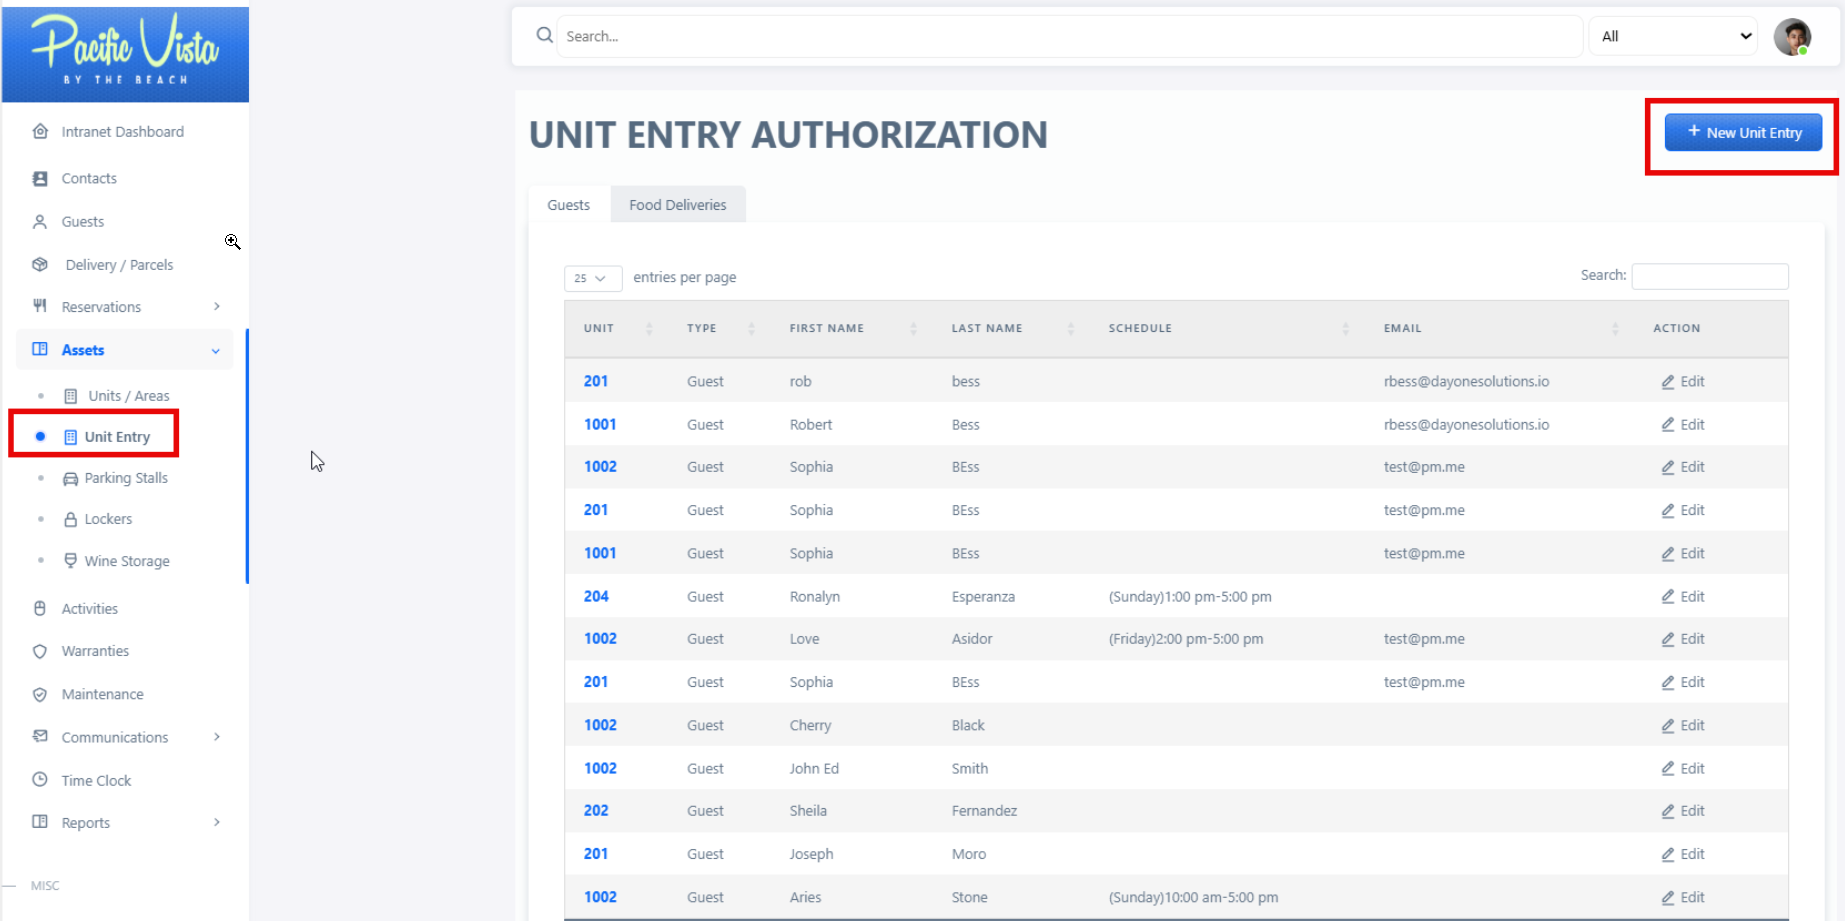
Fill in the required information, such as 'Unit' (you can either type it in manually or click the dropdown arrow to select from the options).
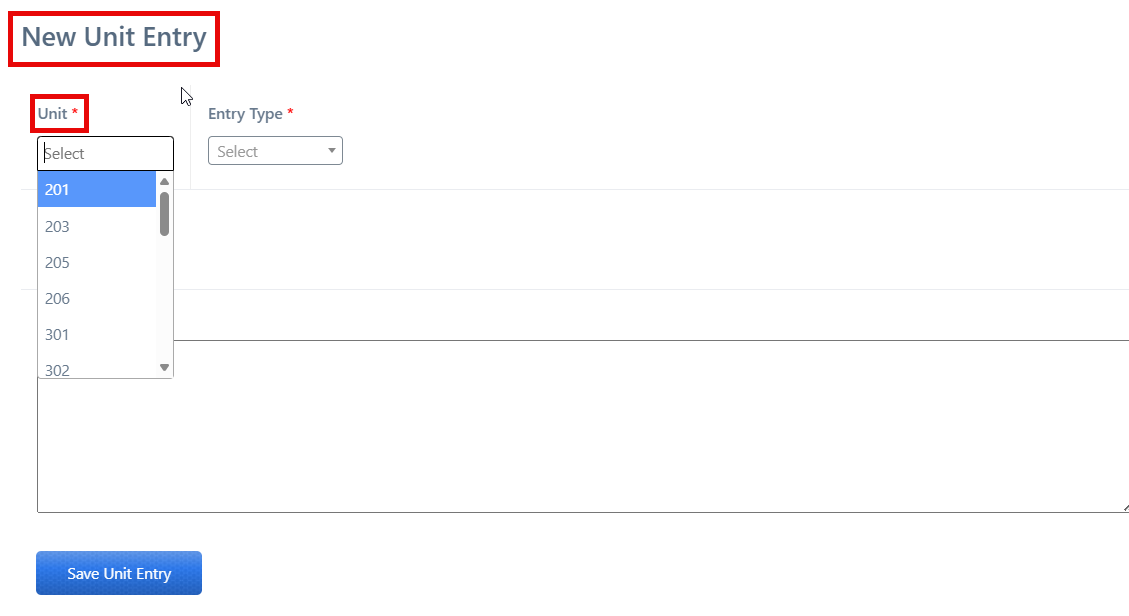
You may add a specific “Note.”
Once you have filled in all the necessary details, you may click "Save Unit Entry".
2. Resident/User - Residents can request or approve entry authorizations for guests or deliveries related to their unit, Review notifications about incoming guests or deliveries, provide additional instructions or notes for the authorization, ay verify or confirm identities).
Select 'My Account' by clicking on it.
Click the 'Unit Entry Authorization' button.
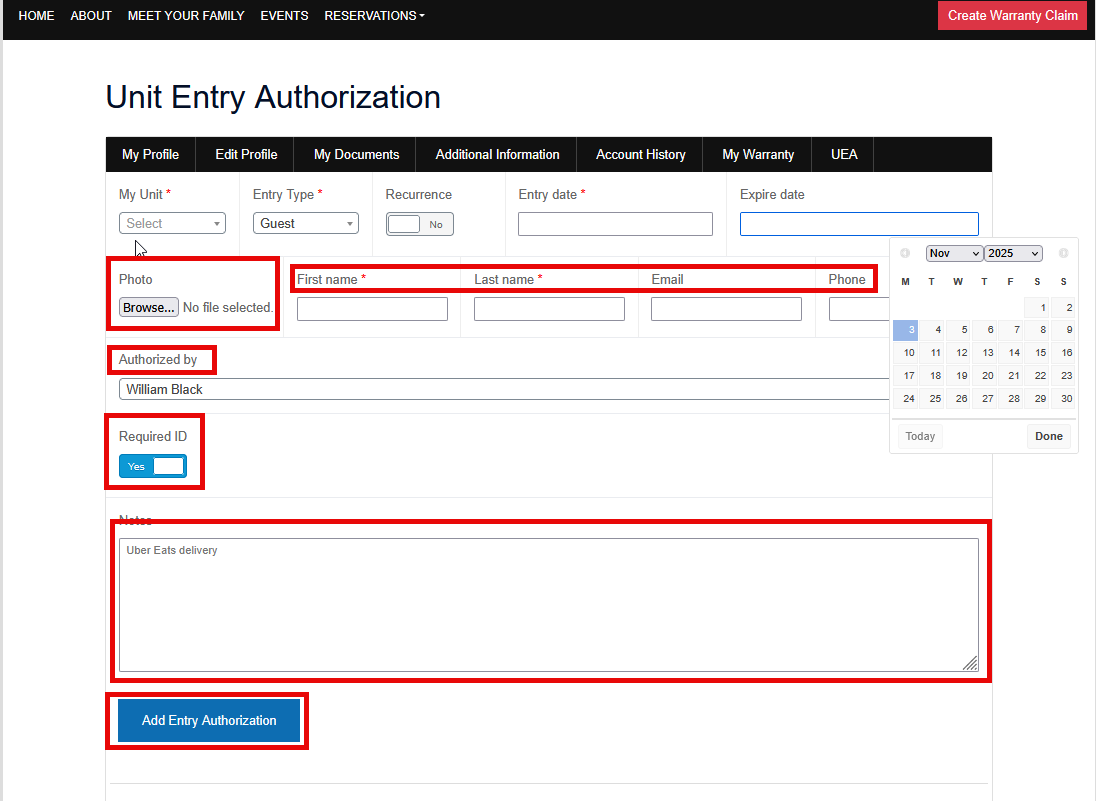
Fill in the required information, such as 'Unit'.
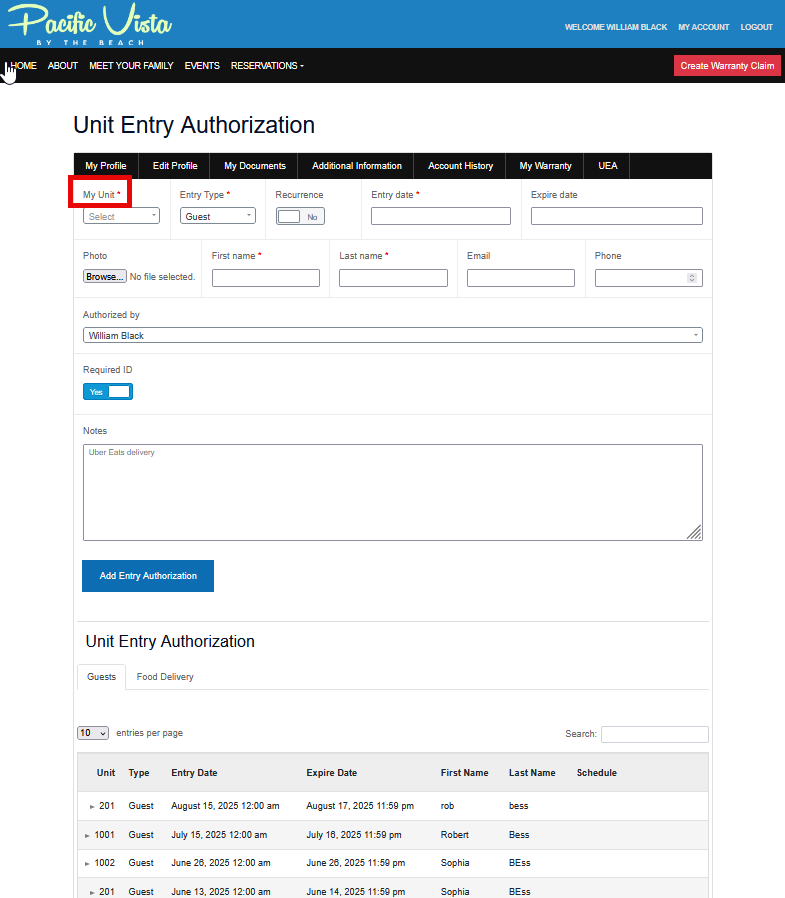
Select the correct or applicable 'Entry Date'.
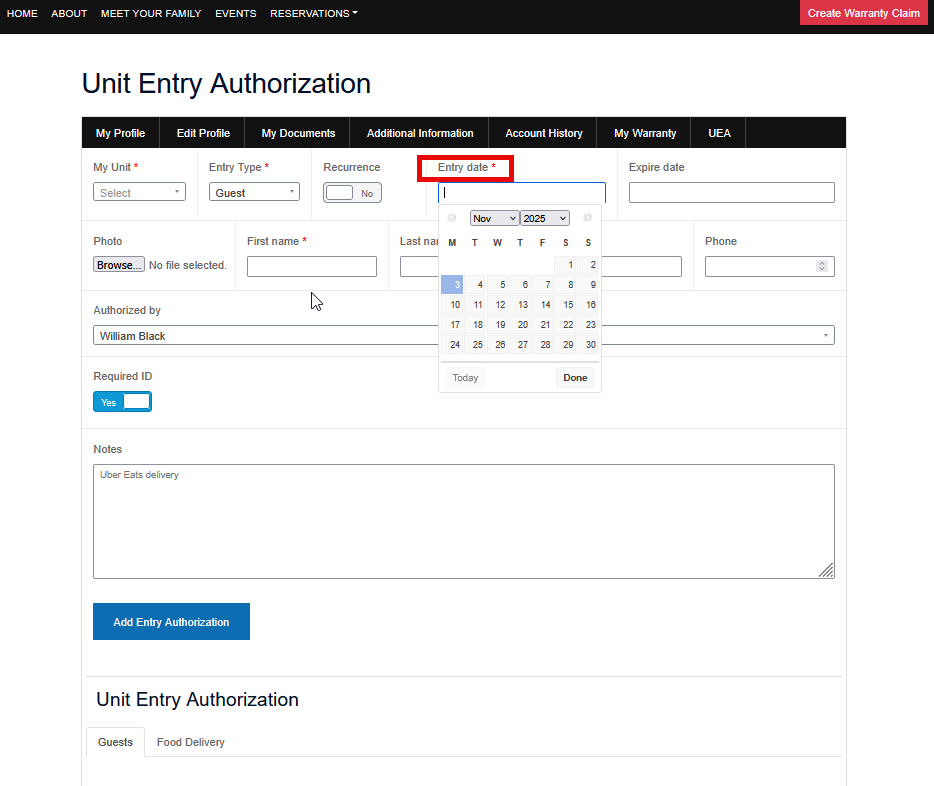
Next, select the 'Expiry Date'.
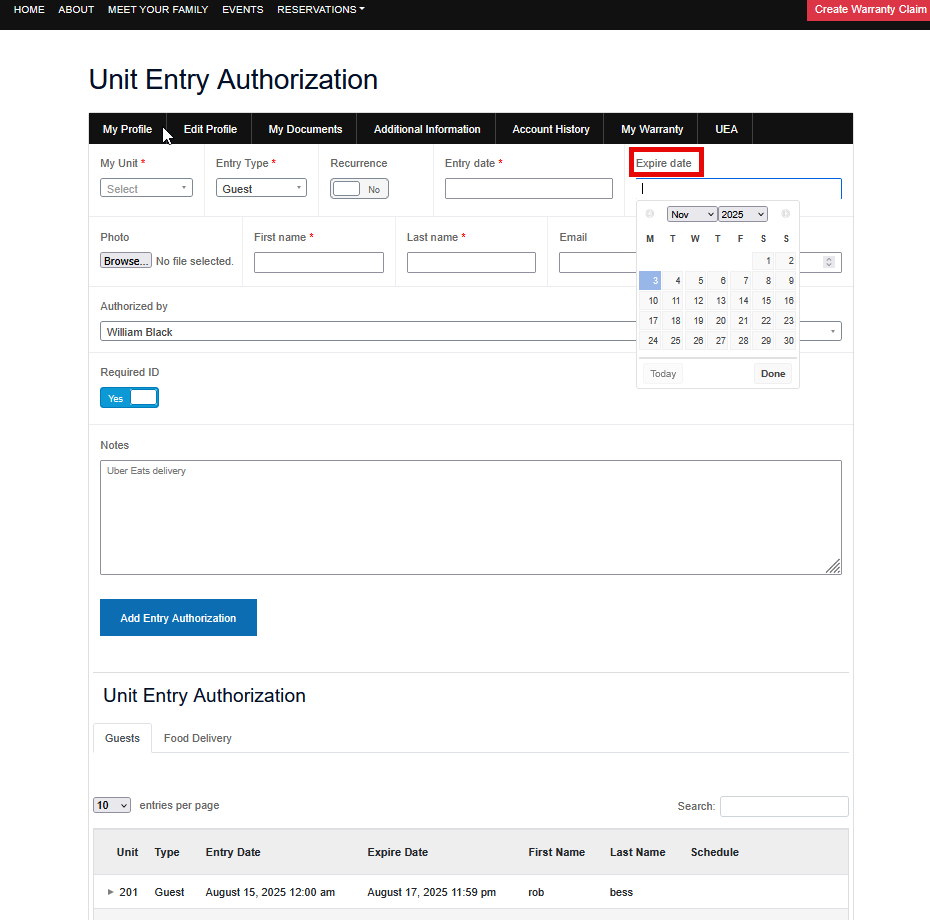
After completing the initial steps, you may attach a photograph by selecting the blue ‘Add Image’ button. Please ensure all mandatory fields—‘First Name,’ ‘Last Name,’ ‘Email,’ and ‘Phone’—are accurately completed. There is an option to require identification; simply enable this by toggling the ‘Require ID’ switch. Additionally, you may include any relevant instructions in the ‘Notes’ section. Finally, be sure to click ‘Add Unit Entry’ to save your submission.
Please note: Upon verification and registration as an authorized visitor, the guest will be issued a Card Key. This Card Key will remain active only for the dates specified in the authorization form and will be automatically deactivated following the expiration date.
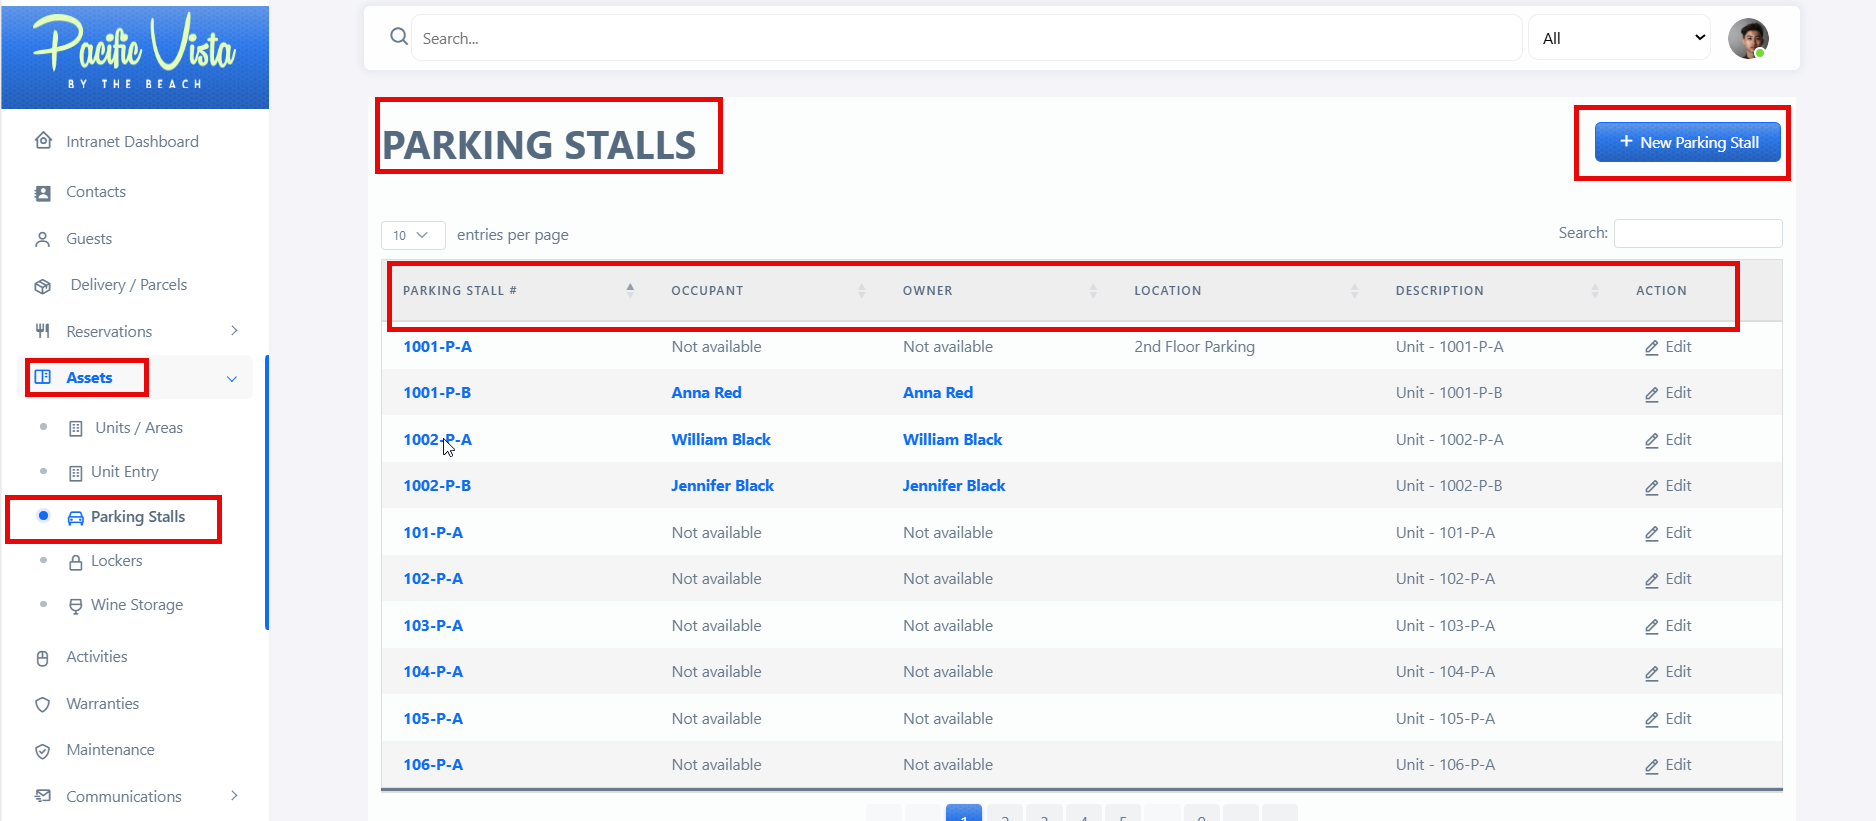
Parking Stalls
Please find attached the video for the Parking Stalls.
This section displays comprehensive information about all parking stalls, including their identifiers, locations, statuses, and assigned users (if applicable). It also includes a built-in feature that enables authorized personnel to register or add new parking stalls through a dedicated input form. This functionality helps maintain accurate parking data and supports efficient system management.

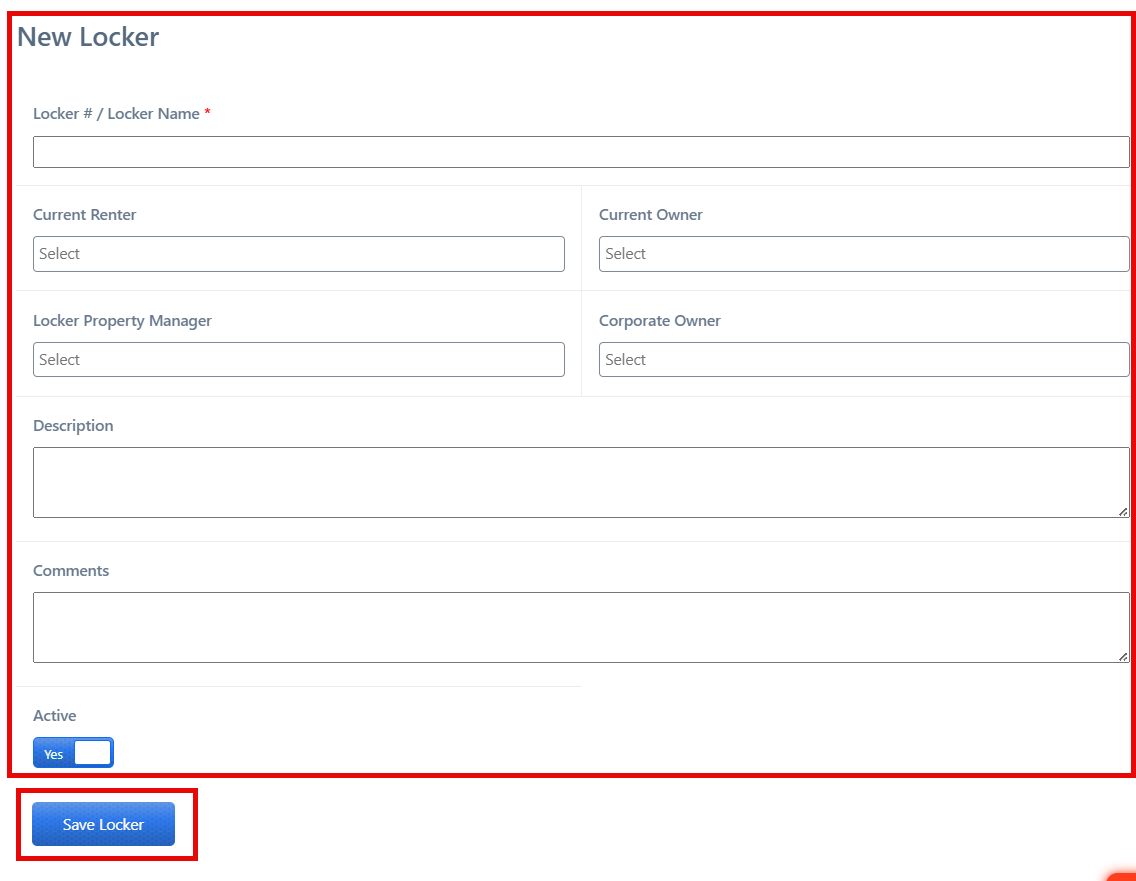
Lockers
The Lockers section displays comprehensive details of all registered lockers, including the "Locker Name", "Renter", "Owner", Description, and Action options. This feature allows administrators or authorized users to monitor and manage locker assignments efficiently.
Please find attached the video for the Lockers.
A “New Locker” button is also provided to add additional lockers. By selecting this option, users can input the required information and register new lockers in the system.

After completing all required details, click “Save Locker.”
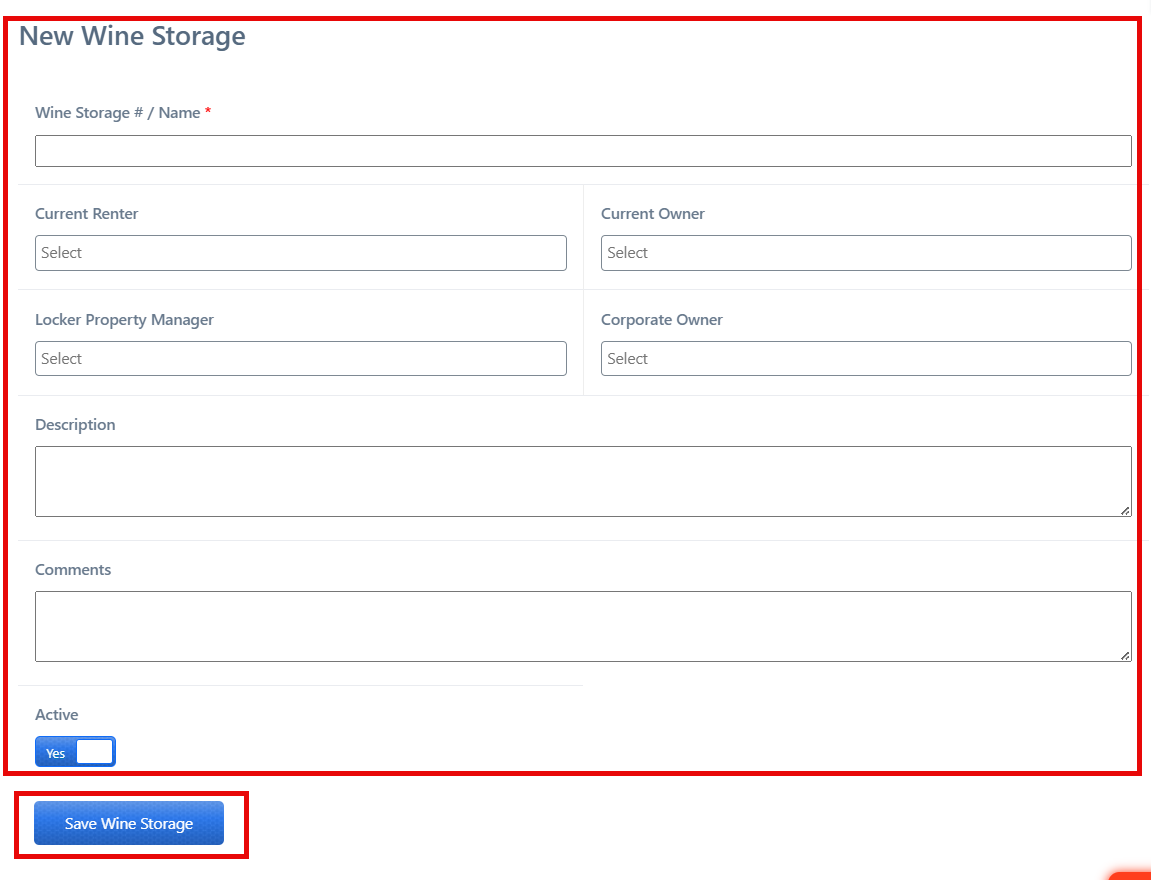
Wine Storage
This section presents detailed information on each wine storage unit, including Wine Storage Number, Renter, Owner, Description, and available Actions. It serves as a centralized reference for managing and overseeing all wine storage assignments.
Please find attached the video for the Wine Storage.
To add a new wine storage unit, select the “New Wine Storage” button and provide the required information to properly register and manage the unit.
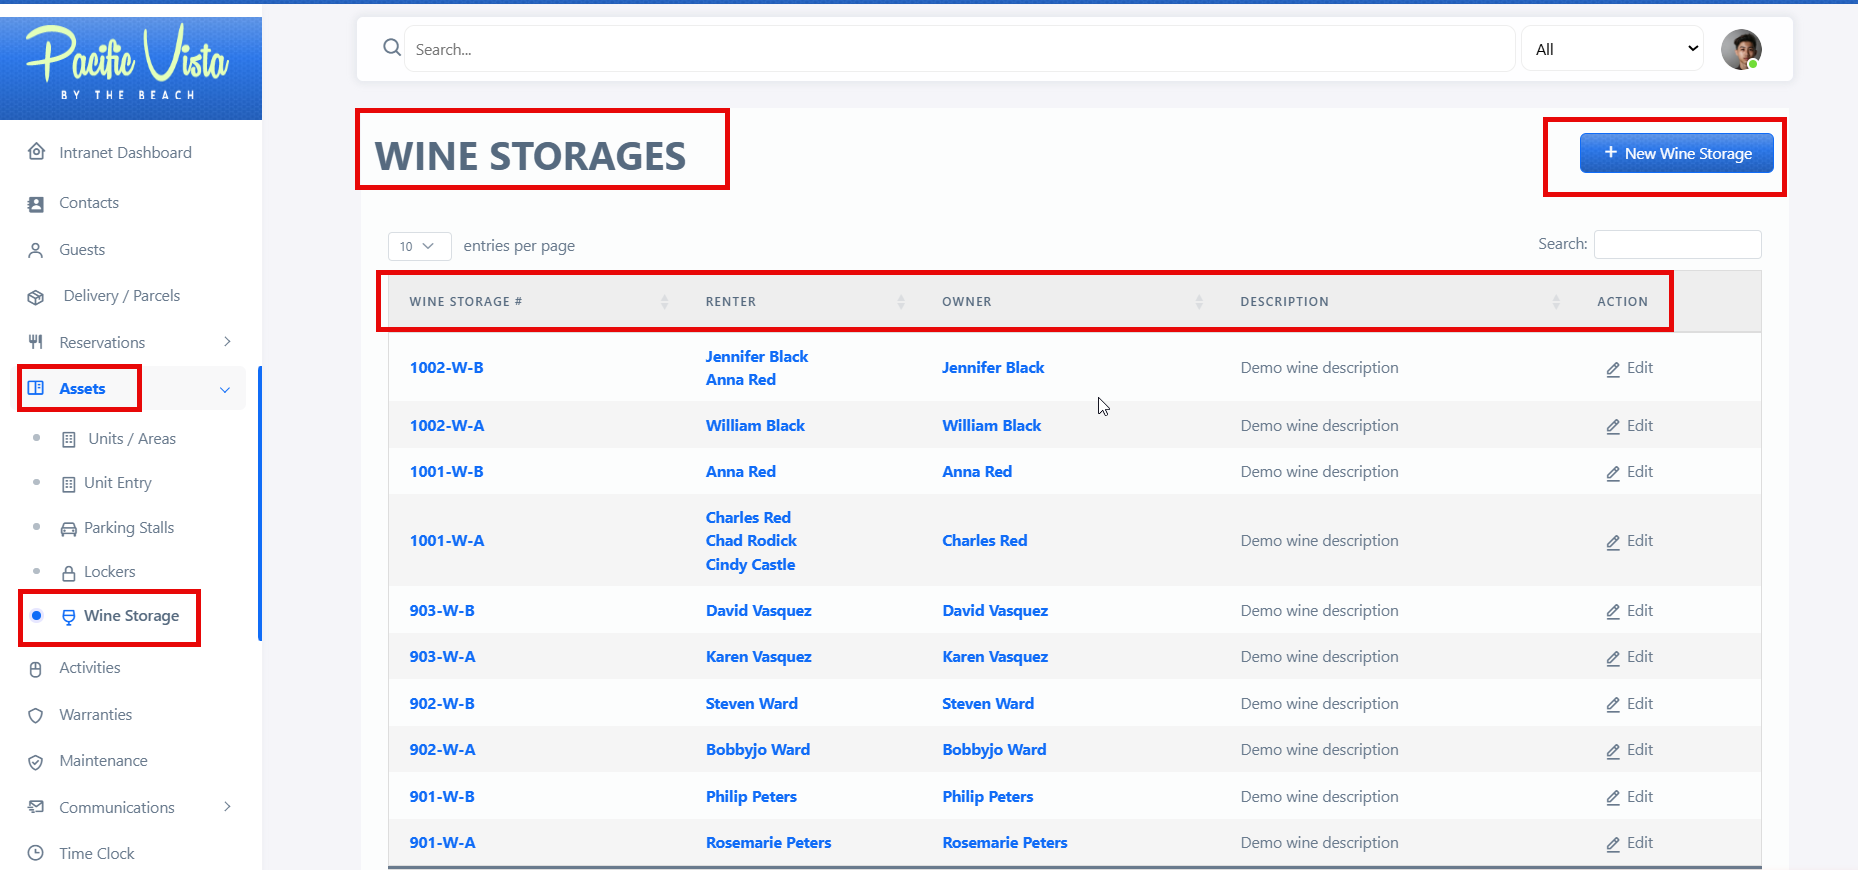
After completing all required details, click “Save Wine Storage”
Communications
Boards and Announcements
This section displays all active and inactive announcements within the system. It provides three main functions:
This layout helps users efficiently manage and monitor all announcements in one place.
Here is the tutorial video on Boards and Announcements.
Follow these Steps to navigate and use Boards and Announcements:
- Click "Communication"
- Click "Announcement"
- Click "Reload Button", it refreshes the list to ensure that the latest announcements are displayed.
- Click "Ok" after the list has been refreshed.
- Click "New Board"
- Go to "Title", you may type in your desired title, or you can also choose from the list available.
- "Test C" was selected (recently used data)
- Click "Save Board"
- After saving the board, you will be redirected to the Boards and Announcement page, where the newly added boad , "Testing C", will be displayed.
Please find the link to the Step-By-Step reference guide for Boards and Announcements. Board and Announcement.png
✅ Tips for Creating Effective Boards and Announcement:
- Ensure Clarity and Brevity
Communicate information clearly and directly. Use concise language and avoid unnecessary details. Bullet points or numbered lists help make content easy to read and understand. -
Craft Informative and Engaging Titles
Use titles that accurately reflect the content and capture the reader’s attention.
Example: Instead of “Update,” use “Revised Submission Guidelines Effective November 10.” - Keep Content Current and Relevant
Post announcements promptly and remove outdated information. Regular updates help maintain reader engagement and credibility. -
Organize Information Effectively
Categorize announcements (e.g., Reminders, Events, Policy Updates) to help users quickly locate relevant information. - Maintain a Professional and Visual Layout
Incorporate visual elements—such as icons, highlights, or consistent formatting—to improve readability. Ensure that colors, fonts, and alignment follow organizational standards.
Events
Events refer to scheduled activities, meetings, or occasions that are posted on platforms to inform, engage, or coordinate participants. They serve as a central reference point for users to view upcoming activities and take necessary actions, such as registration, attendance, or participation. Properly structured event posts increase clarity, attendance, and overall effectiveness of communication.
Here is the tutorial video on Events.
Please follow these steps to ensure your Event is accurately created and properly managed:
- Click "Communications"
- Click "Events"
- Enter relevant keywords and select the "Find" button to locate Event. (List, Mont or Day as needed), you can make new by Clicking "New Event".
- Go to "Event Name" and enter your desired event name.
- You may now proceed with creating or adding your intended content.
- Please ensure that the appropriate "Start Date and "Time" are entered.
- Please also provide the correct "End Date" and "Time"
- "Select Venue", choose you venue.
- You may also choose an appropriate venue from the available list.
- You May also choose an appropriate "Organizer" from the available list or just simply type it in.
- If applicable, please enter the "Event Cost", you may also include the "URL" if desired.
- Click "Submit Form".
Click this link to follow Step-By-Step Capture instructions for Events.Events.png
✅ Tips for Creating Effective Events
- Use Clear and Descriptive Titles
Ensure the Event name clearly communicates the purpose and is easy to understand at a glance.
Example: Instead of “Meeting,” use “Quarterly Team Strategy Meeting – November 10.” - 2. Specify Accurate Dates and Times
Include both the start and end dates and times to prevent confusion and help participants plan their schedules. - Provide a Clear Venue or Location
Indicate whether the event is virtual or physical, and provide the relevant links or addresses - Include Relevant Details
Provide essential information such as agenda, objectives, or instructions for participation. Keep it concise and focused. - Add Optional Information Thoughtfully
Include Event Cost, registration links, or additional resources if necessary. Make optional fields easy to identify. -
Use Filters and Categories
Categorize events by type, month, or department to make browsing easier. -
Keep Content Updated
Remove outdated events and update any changes promptly to maintain accuracy and reliability.
Gate Keeper
Email Notifications
Email Notifications is a platform that allows you to communicate concerns or provide updates efficiently.
Watch the Comprehensive Step-by-Step Instructions on How to Send an Email.
Follow these steps to ensure your message is sent correctly:
1. Click “Communications”
2. Click “Email”
3. Enter Recipients
- Fill in the ‘Recipients’ field with the email addresses of the people you want to contact.
4. Select Residents (multiple allowed)
- Use the ‘Select Resident’ option to choose one or more recipients. Multiple selections are allowed.
5. Add a clear and appropriate Subject line
- Provide a clear and concise ‘Subject’ line that summarizes your message.
6. Here you can start composing the message you want to send
- Enter your message in the ‘Message’ field. Make sure it is clear and professional.
7. To include an attachment, click this option to attach file
- If needed, click ‘Attachments’ or ‘Image’ to include supporting documents or photos.
8. Click “Send Email”
- After completing all fields and attachments, click ‘Send Email’ to deliver your message.
Click this link to follow Step-By-Step Capture instructions for sending an email. EMAIL.png
✅ Tips for Effective Emails:
· Double-check recipient addresses before sending.
· Keep your message concise and to the point.
· Use professional language and formatting.
· Include attachments only when necessary.
Maintenance
Maintenance refers to the systematic care, servicing, and repair of equipment, facilities, or systems to ensure they function safely, efficiently, and reliably. It is a critical practice that helps prevent unexpected failures, extend the lifespan of assets, and maintain smooth, uninterrupted operations.
Warranties
Warranty Activity
Within the Warranty Activity section, you have the ability to create new Activity Types. When setting these up, please ensure that all required fields are completed, including Activity Type Name, Parent, Color, Default Responsible, and Description.
There is also a Warranty Setting section, where you can configure and manage various warranty-related parameters to ensure proper system functionality.
1. Warranty Activity
The Warranty Activity section has been fully documented and refined to allow users to create and manage Activity Types. Each Activity Type requires specific information to ensure clarity and proper tracking:
-
Activity Type Name: Enter the name that identifies the type of activity.
-
Parent: Select the appropriate parent category to classify the activity.
-
Color: Choose a color to visually categorize the activity type for easier identification.
-
Default Responsible: Assign a default person or team responsible for handling this activity type.
-
Description: Provide a detailed description of the activity to clarify its purpose and scope.
2. Warranty Setting
The Warranty Setting section allows users to configure system-wide parameters for warranties, ensuring that all processes align with organizational requirements. Key functions include:
-
Managing default parameters and settings for warranty processing.
-
Ensuring proper assignment of responsibilities and workflows.
-
Facilitating smooth tracking, reporting, and management of warranty requests.
By properly configuring this section, organizations can maintain a standardized and efficient warranty management system.
Please see the attached video, which provides a detailed overview of the Warranty Activity and Warranty Setting.
Follow these Steps to navigate and use Warranty Activity: Warranty Activity.pdf
- Click "Administrative Tasks"
- Click "New Activity Type"
- Ensure that the Activity Type Name field is completed with the correct and relevant information.
- Select the appropriate Parent as desired
- Choose a Color to apply for color-coded categorization
- Click "Submit"
Follow these Steps to navigate and use Warranty Setting: Warranty Setting.pdf
- Click "Administrative Tasks"
- Click "Warranty Settings"
- On "Warranty Activity"
- Select the appropriate Warranty Triggered Action in this section.
- Click "Save Setting"
- The updates you have made will be reflected in.
✅ Tips for Warranty Activity:
-
Ensure Accurate Data Entry: Verify that all fields, including Activity Type Name, Parent, Color, Default Responsible, and Description, are completed correctly.
-
Select Appropriate Options: Choose the correct Parent and Warranty Triggered Action to ensure proper workflow and tracking.
-
Use Color-Coding Wisely: Assign colors to Activity Types for easy identification and visual organization.
-
Provide Clear Descriptions: Include detailed descriptions to clarify the purpose and scope of each activity.
-
Review Before Saving: Double-check all entries to avoid errors and ensure that updates are correctly reflected in the system.
-
Maintain Consistency: Follow established standards and naming conventions for all activity types.
Warranties Dashboard
Details about warranties related to the facility's equipment, units, or other services. This includes warranty periods, coverage details, and how to claim a warranty.
- All Warranties - Within the All-Warranties section, you can view the warranty title and date logged. You also have the option to view or update warranties by clicking "Action."
Here is the Tutorial video on Warranties Dashboard:
Follow these Steps to navigate and use Warranties Dashboard:
- Click “Warranties.”
-
Click “New Warranty Request.”
-
Under “Type,” choose the appropriate option from the list.
-
In the “Unit Recipient” field, enter the correct recipient unit.
-
Accurately enter the First Name.
-
Accurately enter the Last Name.
-
Provide the Email Address.
-
Provide the Telephone Number.
-
Click “Add Date.”
-
Select “Entry Dates.”
-
Complete the Entry Date field.
-
Enter the Start Time
-
Enter the End Time
-
Clearly state your request in the “Describe Your Request” field.
-
(Optional) Upload or capture a photo in the Photo Source section if needed.
-
Click “Save Warranty.”
Please find the link to the Step-By-Step reference guide for Warranties. Warranties Dashboard.pdf
✅ Tips for Warranties Dashboard:
-
Ensure Data Accuracy: Confirm that all required fields—names, dates, contact information, and unit details—are entered correctly before submitting.
-
Provide Clear Descriptions: Clearly outline the issue or request to facilitate faster evaluation and processing.
-
Include Supporting Photos When Relevant: Uploading images can help provide context and improve the accuracy of the assessment.
-
Complete All Mandatory Fields: Incomplete submissions may result in delays, so verify that all required sections are properly filled out.
-
Review Before Finalizing: Take a final moment to review all entered information prior to selecting “Save Warranty.”
Creating a Warranty Status
Warranty Status refers to the current state of a product’s warranty claim or warranty coverage. It helps track where a request stands in the warranty process—from submission, review, approval, repair/replacement, up to completion or closure.
This also clearly defined triggers, actions, and next steps to ensure efficiency, transparency, and timely communication with both internal teams and customers. Automated notifications and logs are in place to maintain accountability and improve reporting.
Please see the attached video, which provides a detailed overview of Creating a Warranty Status.
Follow these Steps in Creating a Warranty Status: Creating a Warranty Status.pdf
- Click "Administrative Tasks"
- Click "Warranty Status"
- Click "New Warranty Status"
- Please select the Color you would like to use for the color coding.
- Ensure that the Warranty Status Name field is completed with the correct and relevant information.
- Please enter your desired Description.
- Please enter your desired Comments.
- Here you can see that the new Warranty Status you created is now available.
Follow these Steps to navigate and use Warranty Setting: Creating A Warranty Status (Warranty Settings).pdf
- Click "Administrative Tasks"
- Click "Warranty Status"
- Click "Warranty Settings"
- On "Warranty Status"
- Please select your desired status.
- Click "Save Setting"
✅ Tips for Warranty Activity:
-
Define Clear Statuses
-
Each stage should have a specific, unambiguous name (e.g., Pending, Under Evaluation, Approved, In Progress, Completed).
-
Avoid vague terms like “Processing” without context.
-
-
Assign Responsibilities
-
Clearly indicate which team or individual is responsible at each status.
-
This prevents confusion and ensures accountability.
-
-
Set Triggers for Each Status
-
Determine what action or event moves a claim from one status to another.
-
Example: “Under Evaluation → Waiting for Approval” occurs when verification is complete.
-
-
Automate Notifications
-
Notify customers and internal teams at key stages to keep everyone informed.
-
Automation reduces delays and manual follow-ups.
-
-
Include Sub-Statuses or Tags
-
Use sub-statuses like “Awaiting Parts” or “Escalated” for better tracking of complex cases.
-
-
Provide Customer-Friendly Names
-
For any customer-facing system, use simple, clear terminology they can understand.
-
-
Track and Log Changes
-
Every status change should be timestamped and logged for auditing and reporting purposes.
-
-
Monitor Turnaround Time
-
Track the time spent in each status to identify bottlenecks and improve efficiency.
-
-
Keep Statuses Consistent
-
Use the same terms and workflow across all products and teams to avoid confusion.
-
-
Review and Improve Regularly
-
Periodically evaluate the workflow to ensure it aligns with operational needs and customer expectations.
New Warranty Claim - Resident's Portal
The New Warranty Claim feature in the Resident’s Portal allows residents to submit warranty requests efficiently, ensuring that all relevant information is captured for proper processing and tracking. The system is designed to be user-friendly while providing your service or operations team with the data they need to act quickly.
Unit Recipient
-
Description: The specific unit or property for which the warranty claim is being submitted.
-
Purpose: Ensures the warranty request is tied to the correct property, helping avoid confusion or misallocation of resources.
First Name & Last Name
-
Description: Resident’s first and last names.
-
Purpose: Identifies the claim submitter, enabling personalized communication and proper documentation.
Email Address
-
Description: The resident’s email.
-
Purpose: Used for notifications regarding the claim status, approvals, and updates.
Telephone Number
-
Description: Resident’s contact number.
-
Purpose: Allows the service team to follow up for additional details or scheduling service.
Add Date (Entry Date, Start Time, End Time)
-
Entry Date: The date when the claim is submitted.
-
Start Time & End Time: Optional fields to indicate when the issue occurred, or when service is requested.
-
Purpose: Helps in scheduling, tracking claim timelines, and analyzing trends or recurring issues.
Describe Your Request
-
Description: A text field where residents provide details about the issue or service needed.
-
Purpose: Gives the service team a clear understanding of the problem, ensuring the correct resources and personnel are assigned.
Save Warranty
-
Description: The action button to submit the claim once all fields are completed.
-
Purpose: Captures all entered information and stores it in the system, triggering notifications to the responsible team and initiating the warranty process.
Please see the attached video, which provides a detailed overview of the New Warranty Claim - Residents Portal.
Follow these Steps to make a New Warranty Claim - Resident's Portal: New Warranty Claim - Resident's Portal.pdf
- Click "Create Warranty Claim"
- Select the "Unit Recipient"
- Enter personal detail "First Name"
- Enter personal detail "Last Name"
- Enter personal detail "Email Address"
- Provide "Telephone Number"
- Click "Add Date"
- Choose your "Entry Date"
- Select the "Start Time"
- After selecting the Start Time, click "Select"
- Select the "End Time"
- After selecting the End Time, click "Select"
- Click "Describe your request"
- Click "Save Warranty"
✅ Tips for New Warranty Claim - Resident's Portal:
-
Ensure Accurate Unit Selection
-
Always select the correct Unit Recipient to avoid delays or misallocation of resources.
-
-
Provide Complete Personal Details
-
Fill in First Name, Last Name, Email Address, and Telephone Number accurately to ensure proper communication.
-
-
Use Correct Dates and Times
-
Specify the Entry Date accurately.
-
Use Start Time and End Time if applicable, to indicate when the issue occurred or service is requested.
-
-
Describe the Issue Clearly
-
Provide a detailed description in the Describe Your Request field.
-
Include specific symptoms, affected areas, or any relevant information to help the service team understand the problem quickly.
-
-
Review Before Saving
-
Double-check all entered information before clicking Save Warranty.
-
Ensure all mandatory fields are completed to prevent claim rejection or delays.
-
-
Follow Up Through the Portal
-
Monitor your claim status via the Resident’s Portal.
-
Respond promptly if additional information is requested to avoid delays in processing.
-
-
Keep Records
-
Save or take note of the confirmation once the claim is submitted.
-
This helps in referencing your claim for future communication or follow-ups.
-
-
Use the Portal Regularly
-
Submitting and tracking claims via the portal ensures faster processing than manual methods.
-
Warranty Subcontractor Magic Link
A Warranty Magic Link is a secure, unique URL or link generated by a warranty management system that allows users—such as managers or subcontractors—to access specific warranty claims or related information directly without needing to log into the system manually.
This feature simplifies the process of viewing, updating, or approving warranty requests while maintaining security and traceability.
For Admin/Manager - Here is the video that shows where the Magic Link can be found:
After copying the Magic Link, you can open it in your browser.

Steps for using the Magic Link are outlined here. Magic link.pdf
For Subcontractor - Video example of the Email received by the Subcontractor to notify them of a new warranty assignment:
After assigning a Subcontractor, the Subcontractor will receive an Email notification at their email address informing them of a New Warranty Assignment. The email will also include a link to their specific warranty assignment. Example Email sent to Subcontractor.pdf
Creating a New Resources/Subcontractor
Creating a new Resource or Subcontractor in the system is an essential step in organizing service providers who support your warranty operations, maintenance tasks, or project requirements. This process ensures that every subcontractor is properly registered, identifiable, and ready to be assigned to specific work orders, warranty claims, or service activities.
Please see the attached video, which provides a detailed overview of Creating a New Resources/Subcontractor.
Follow these Steps in Creating a New Resources/Subcontractor: Creating a New Resources.Subcontractor.pdf
- Click "Contacts"
- Click "Resources"
- Click "New Contacts"
- Ensure that the UserName field is completed with the correct relevant information
- Enter "Email Address"
- Please enter "First Name"
- Please enter "Last Name"
- Select the "Subcontractor Role"
- Click "Register"
✅ Tips in Creating a New Resources/Subcontractor:
-
Ensure Accurate Information
-
Enter complete and correct details such as the contractor’s name, contact information, and company details to avoid issues during assignment or communication.
-
-
Assign the Correct Role
-
Select the appropriate subcontractor role to ensure proper classification and access based on their specialization or function.
-
-
Verify Required Documentation
-
Upload any necessary licenses, permits, certifications, or insurance documents if applicable. This ensures compliance and readiness for deployment.
-
-
Specify the Service Category
-
Clearly identify the subcontractor’s area of expertise (e.g., electrical, plumbing, carpentry) to streamline task assignments and warranty service routing.
-
-
Use Clear and Updated Contact Details
-
Make sure that the phone number and email address provided are active and regularly monitored to support smooth coordination.
-
-
Check for Duplicates
-
Before creating a new entry, verify if the subcontractor already exists in the system to avoid duplicate records.
-
-
Activate the Subcontractor
-
Ensure the status is set to Active so the subcontractor becomes available for work orders or warranty claim assignments.
-
-
Maintain and Update Records
-
Periodically review subcontractor profiles to keep their information up to date, especially if they change contact details, service scope, or availability.
-
-
Add Internal Notes (If Needed)
-
Document any important internal information such as work preferences, availability constraints, or performance notes.
-
-
Save and Review the Entry
-
After completing all fields, review everything before saving to ensure accuracy and completeness.
Manager/Admin Guide: Reviewing and Approving or Denying New Warranty Claims Submitted by Residents in the Resident’s Portal
On the Manager/Admin side, once a Resident/User submits a New Warranty Claim, it will appear in the Warranties section with the status ‘Pending Gate Keeper.’ The Gate Keeper is a key part of the warranty process, as actions to approve or deny the Warranty Request are carried out under the Gate Keeper section within Resources.
Attached is the video recorded earlier, demonstrating the Resident/User submitting a Warranty Claim.
Approved Warranty Claim - This is the video taken after the Resident/User submitted the Warranty Claim, which can be viewed on the Manager/Admin side. It demonstrates how the request is reviewed and approved using the Gate Keeper.
Follow these steps to access and manage Warranty Claims using the Gate Keeper for Approval. Manager.Admin Guide.Reviewing and Approving.Denying New Warranty Claims Submitted by Residents in the Resident’s Portal.pdf
- Click "Warranties"
- Click "Go to Gatekeeper"
- Go to Action/Status and select the status or action you want: "Approve" or "‘Deny"
- Here, select the action you want to take for the Warranty Claim submitted by the Resident/User
- For example, if you select the action "Approved", once it has been approved, you can check the recently approved Warranty Claim from the Resident/User in the "Approved" tab.
- To check under the Approved tab, you can view the newly approved Warranty Claim.
Denied Warranty Claim - This is the video taken after the Resident/User submitted the Warranty Claim, which can be viewed on the Manager/Admin side. It demonstrates how the request is reviewed and denied through the Gate Keeper.
Follow these steps to access and manage Warranty Claims using the Gate Keeper for Denying.Denied.Rejected Warranty Claim.pdf
- Click "Warranties"
- Click "Go to Gatekeeper"
- Click "Approve" or "‘Deny"
- Click "Comment/Reason" and enter the comment/reason for denying the Warranty Claim submitted by the User/Resident
- Click "Reject"
- Click "Rejected" tab
- This is where the Rejected/Denied Warrant Claim request will be reflected
✅ Tips for: Manager/Admin Guide: Reviewing and Approving or Denying New Warranty Claims Submitted by Residents in the Resident’s Portal:
-
Verify Claim Details Thoroughly
-
Always review the resident’s submitted information, including unit details, contact information, and request description, to ensure accuracy before taking action.
-
-
Check Warranty Coverage
-
Confirm that the issue falls within the product or unit’s warranty terms.
-
Validate dates, documentation, and any required proof of purchase or installation.
-
-
Use Gate Keeper Actions Properly
-
The Gate Keeper plays a key role in determining whether a claim should move forward.
-
Ensure you select the correct action—Approve or Deny—based on your evaluation.
-
-
Provide Clear Reasons When Denying a Claim
-
If a claim must be denied, include a brief but clear explanation to avoid misunderstandings and reduce follow-up questions from residents.
-
-
Use Notes for Internal Communication
-
Add notes or internal comments if additional clarification is needed by the service team or if the claim requires special handling.
-
-
Track Status Updates Regularly
-
Once approved, monitor the claim as it moves through the process (In Progress → Completed → Closed) to ensure timely resolution.
-
Assigning Subcontractor
Assigning a Subcontractor is a structured process in which a registered subcontractor is linked to a specific task, project, or warranty claim within a system or workflow. The purpose of this process is to ensure that the right service provider—one with the appropriate skills, certifications, and availability—is responsible for completing the work.
Please see the attached video, which provides a detailed overview of the process for Assigning a Subcontractor.
Follow these Steps in Assigning Subcontractor: Assigning Subcontractor.pdf
- Click "Warranties"
- Click "Assign Resource"
- Within the "Resource/Subcontractors" field
- Select the appropriate "Resource/Subcontractor" to assign
- Within the "Resource/Subcontractors" field
- Select the appropriate "Trades" to assign
- Within the "Target Due" field
- Select the desired option in "Target Due”
- Within the "Internal Note" field, add an "Internal Note" if desired
- Click "Assign Subcontractor"
✅ Tips in Assigning Subcontractor:
-
Verify Subcontractor Qualifications
-
Ensure the subcontractor has the necessary skills, certifications, and experience to perform the assigned task.
-
-
Select the Appropriate Resource
-
Match the subcontractor’s trade, expertise, and availability to the task or project requirements.
-
-
Check Availability
-
Confirm that the subcontractor is available for the target due date to avoid delays.
-
-
Use the System Fields Correctly
-
Assign the subcontractor within the Resource/Subcontractors field and select the correct Target Due date.
-
-
Add Internal Notes When Necessary
-
Include any relevant instructions, clarifications, or reminders in the internal notes section to guide the subcontractor.
-
-
Notify the Subcontractor
-
Ensure the subcontractor receives confirmation of the assignment and understands the task requirements.
-
-
Review Before Finalizing
-
Double-check the selected subcontractor, due date, and notes to prevent errors.
-
-
Maintain Documentation
-
Keep a record of all assignments for tracking, accountability, and reporting purposes.
-
-
Update Assignments as Needed
-
If there are changes to the task, trade requirements, or subcontractor availability, update the assignment promptly.
-
Adding Trades to a Subcontractor
Adding Trades to a Subcontractor is an important step in defining the specific skills, expertise, or services that a subcontractor can provide within your system. This ensures that each subcontractor is properly categorized and can be accurately assigned to work orders, warranty claims, or maintenance tasks that require their particular trade.
Please find attached the video in Adding Trades to a Subcontractor.
Follow these Steps in Adding Trades to a Subcontractor: Adding Trades to Subcontractor.pdf
- Click "Contacts"
- Click "Resources"
- Select "Plumbers Choice" as a sample Subcontractor
- Click "Resources"
- Click "Add Resources"
- Select the desired "Trade Types"
- Click "Add Row" for SLA hours
- Enter desired "Start Time"
- Click "Select" after choosing the Start Time
- Enter desired "End Time"
- Click "Select" after choosing the End Time
- Click "Save Resource"
- Here you can see that the Trade Types you added for the selected Subcontractor have been successfully added
✅ Tips for Adding Trades to a Subcontractor:
-
Verify Subcontractor Qualifications
-
Ensure the subcontractor is certified or skilled in the trade before assigning it.
-
-
Select Relevant Trades Only
-
Choose trades that accurately reflect the subcontractor’s expertise (e.g., Electrical, Plumbing, Carpentry).
-
-
Assign Multiple Trades Judiciously
-
Only add additional trades if the subcontractor is qualified to perform them. Avoid overloading the profile.
-
-
Update Trades Regularly
-
Review and revise trades whenever subcontractors gain new skills or change their service scope.
-
-
Use Consistent Naming
-
Maintain standardized trade names for clarity and easy filtering in the system.
-
-
Document Supporting Details
-
Attach licenses, certifications, or notes for verification and compliance if necessary.
-
-
Check for Duplicates
-
Ensure you are updating the correct subcontractor profile to prevent duplicate entries.
-
-
Confirm and Save Changes
-
Review all selected trades carefully before saving to ensure accuracy.
-
-
Align Trades with Task Requirements
-
Make sure assigned trades match the types of work that the subcontractor will be tasked with, ensuring efficiency and proper workflow.
-
Ticket/Warranty Claim Status for User/Resident
Ticket/Warranty Claim Status for User/Resident - This section outlines the process that Users and Residents can follow to view the current status of their submitted tickets. By providing a clear and accessible method for tracking updates, the system helps ensure transparency, timely communication, and improved service response.
It guides User/ Resident in monitoring the progress of their requests, inquiries, or reported issues.
Please see the attached video for a detailed guide on Ticket/Warranty Claim Status for User/Resident.
Follow these steps to check the Ticket/Warranty Claim Status for User/Resident: Ticket.Warranty Claim Status for User.Resident.pdf
- Once logged in, Click "My Account"
- Click "Account History"
- Click "My Warranty"
- Kindly refer to the "Status" section for details
- Here, you can view your current Ticket/Warranty Claim Status
✅ Tips for Ticket/Warranty Claim Status for User/Resident:
1. Log in with the correct account
-
Ensure you are using the account associated with your ticket or claim.
-
Logging in with a different account may prevent you from seeing your requests.
2. Access the correct section
3. Check your current status regularly
-
Your ticket or claim status may update over time (e.g., Pending, In Progress, Resolved, Closed).
-
Regular monitoring helps you stay informed of any required actions.
4. Review updates and comments
-
Support teams may add notes, instructions, or follow-up questions.
-
Check these carefully to avoid delays in processing.
5. Keep your information secure
-
Your ticket or warranty claim details are personal.
-
Do not share links, account credentials, or sensitive information with others.
6. Contact support if needed
-
If your ticket status hasn’t updated within the expected timeframe or you encounter issues, contact the support or admin team directly.
Multiple Warranty Claim - Resident/User Portal
Multiple Warranty Claim refers to a feature within a Resident or User Portal that allows a resident to submit several warranty-related issues in a single claim form, instead of filing each item separately.
Unit Recipient
-
Description: The specific unit or property for which the warranty claim is being submitted.
-
Purpose: Ensures the warranty request is tied to the correct property, helping avoid confusion or misallocation of resources.
First Name & Last Name
-
Description: Resident’s first and last names.
-
Purpose: Identifies the claim submitter, enabling personalized communication and proper documentation.
Email Address
-
Description: The resident’s email.
-
Purpose: Used for notifications regarding the claim status, approvals, and updates.
Telephone Number
-
Description: Resident’s contact number.
-
Purpose: Allows the service team to follow up for additional details or scheduling service.
Add Date (Entry Date, Start Time, End Time)
-
Entry Date: The date when the claim is submitted.
-
Start Time & End Time: Optional fields to indicate when the issue occurred, or when service is requested.
-
Purpose: Helps in scheduling, tracking claim timelines, and analyzing trends or recurring issues.
Describe Your Request
-
Description: A text field where residents provide details about the issue or service needed.
-
Purpose: Gives the service team a clear understanding of the problem, ensuring the correct resources and personnel are assigned.
Note: If you have additional warranty items to report, you may continue adding them to your claim.
In the attachment section, you can choose to capture a photo, upload a photo, or upload a video as supporting documentation.
Once you have finished adding all your warranty items and attachments, you may proceed to submit your warranty claim.
Please see the attached video, which provides a detailed overview of the Multiple Warranty Claim - Resident/User Portal.
Follow these Steps to make a Multiple Warranty Claim - Resident/User Portal: Multiple Warranty Claims.pdf
- Click "Create Warranty Claim"
- Select the "Unit Recipient"
- Enter personal detail "First Name"
- Enter personal detail "Last Name"
- Enter personal detail "Email Address"
- Provide "Telephone Number"
- Click "Add Date"
- Choose your "Entry Date"
- Select the "Start Time"
- After selecting the Start Time, click "Select"
- Select the "End Time"
- After selecting the End Time, click "Select"
- Click "More Warranty Item"
- Enter detail "Describe your request"
- Choose your preferred attachment source. In this example, I will select the option to "Upload Photo"
- Click "Add Gallery" to begin attaching the item you want
- Click "Upload files"
- Click "Select Files"
- After selecting a file, click ‘Select’ to confirm
- You will now be able to see the Warranty Claims you have submitted here
✅ Tips for Multiple Warranty Claim - Resident/User Portal:
- Provide Clear Descriptions:
Ensure each warranty issue is described accurately and in detail to help the maintenance team understand the problem. - Use Attachments Wisely:
Include photos or videos that clearly show the issue. Choose the most relevant attachment source: capture a photo, upload a photo, or upload a video. - Add Multiple Items Carefully:
Use the “More Warranty Item” option to include all additional claims. Enter details for each issue as instructed in the portal steps. - Review Before Submission:
Double-check that all warranty items and attachments are complete and accurate before submitting your claim. - Track Your Claims:
After submission, monitor the status of each warranty item through the portal to stay updated on progress
Administrative Task
Activity Types
To create a new activity type, complete the fields for 'Activity Type Name', 'Parent', 'Color', 'Default Responsible', and 'Description', then click 'Submit' to save.
When adding or editing a Activity Type, you typically fill out the following fields:
· Activity Type Name – The title or name of the activity.
· Parent – The main or higher-level category that the activity type belongs to (useful for organizing related activities).
· Color – A visual identifier to easily distinguish activity types in dashboards or calendars.
· Default Responsible – The person or team automatically assigned to this type of activity.
· Description – Additional details explaining the purpose or nature of the activity type.
Please find attached the video for the Activity Types.
Follow these Steps to navigate and use Activity Types:
1.Click "Administrative Task"
2. Click "New Activity Type"
5.You may select your preferred color for the color-coding scheme
6.Assign the appropriate individual as the "Default Responsible".
7.Enter a description, if applicable.
8.Click "Submit"
Please find the link to the Step-By-Step reference guide for Activity Types. Activity Type.png
✅ Tips for Activity Types:
1. Use Clear and Descriptive Names – Ensure each activity type has a name that clearly reflects the task or action it represents.
2. Categorize with Parent Types – Organize activity types under parent categories for easier tracking and reporting.
3. Assign Default Responsibilities – Set a default responsible person or team to streamline task assignment.
4. Utilize Color Coding – Apply distinct colors for each activity type to enhance visual organization and quick identification.
5. Provide Relevant Descriptions – Add concise descriptions to clarify the purpose and scope of each activity type.
6. Review and Update Regularly – Periodically check activity types to ensure they remain accurate, relevant, and aligned with current workflows.
Contact Types
Refer to the categories or classifications of contacts you manage in a system
When adding or editing a Contact Type, you typically fill out the following fields:
· Name – The title or specific label of the contact type (e.g., “Customer,” “Vendor,” “Lead”).
· Description – A brief explanation of the contact type’s purpose or role within the system.
· Comments – Additional notes or relevant information about this contact type.
· Save Contact – The action or button used to confirm and store the contact type information in the system.
Please find attached the video for the Contact Types.
Follow these Steps to navigate and use Contact Types:
1. Click "Administrative Task"
2. Click "Contact Types"
3. Click "New Contact Type"
5. Add a Description if desired.
6. Add a Comment if desired
7. Click "Save Contact Type"
Please find the link to the Step-By-Step reference guide for Contact Types. Contact Types.png
✅ Tips for Contract Types:
1. Use Clear and Descriptive Names – Ensure each contact type clearly reflects its purpose.
2. Provide Meaningful Descriptions – Add a brief description to clarify the role of each contact type.
3. Utilize Comments Wisely – Use the comments field to include additional context, guidelines, or notes relevant to the contact type.
4. Be Consistent – Maintain consistent naming conventions and categorization to avoid confusion and ensure accurate reporting.
5. Review Regularly – Periodically review contact types to ensure they remain relevant and aligned with your current workflows.
6. Leverage for Automation – Assign default responsibilities or workflows based on contact types to streamline processes.
Parcel Types
Are classifications used to organize and manage different kinds of parcels within a system. Properly defining parcel types ensures efficient tracking, consistent handling, and streamlined logistics operations.
-helps standardize parcel management, improves operational efficiency, and ensures accurate tracking throughout the delivery process.
When adding or editing a Parcel Type, complete the following fields:
· Name – Enter a clear and descriptive title for the parcel type.
· Description – Provide a concise explanation of the parcel type’s purpose or any special handling requirements.
· Comments – Include any additional notes or relevant information to assist users in managing the parcel type.
· Save Parcel Type – Click this button to confirm and save the parcel type information in the system.
Please find attached the video for the Parcel Types.
Follow these Steps to navigate and use Parcel Types:
1. Click "Administrative Task"
2. Click "Parcel Types"
3. Click "New Parcel Type"
4. Enter the desired name for the new address type.
5. Add a Description if desired
6. Add Comments if desired
7. Click "Save Parcel Type"
Please find the link to the Step-By-Step reference guide for Parcel Types. Parcel Types.png
✅ Tips for Parcel Types:
1. Use Clear and Descriptive Names – Label each address type clearly.
2. Provide Meaningful Descriptions – Add a brief explanation to clarify the purpose or use of each address type.
3. Include Comments When Needed – Use the comments field to add relevant notes or special instructions for the address type.
4. Maintain Consistency – Use a standardized naming convention to ensure addresses are easy to identify and manage.
5. Review Regularly – Periodically check and update address types to keep them accurate and relevant.
6. Leverage for Workflow Efficiency – Use address types to assign responsibilities, automate processes, or streamline reporting.
Address Types
Are used to categorize and organize the different types of addresses managed within the system. To add or edit an address type, complete the fields for Name, Description, and Comments, then click Save Address Type to apply the changes.
- help standardize how addresses are categorized, making it easier to manage contact information efficiently and accurately within the system.
When adding or editing a Address Type, you typically fill out the following fields:
· Name – Enter a clear and descriptive title for the address type.
· Description – Provide additional details explaining the purpose or context of this address type.
· Comments – Add any notes or relevant information that may help users understand or use the address type correctly.
· Save Address Type – Click this button to save and apply your changes to the system.
Please find attached the video for the Address Types.
Follow these Steps to navigate and use Address Types:
1. Click "Administrative Task"
2. Click "Address Types"
3. Click "New Address Type"
5. Add a Description if desired.
6. Add a Comment if desired
7. Click "Save Address Type"
Please find the link to the Step-By-Step reference guide for Address Types. Address Type.png
✅ Tips for Address Types:
1. Use Clear and Descriptive Names – Label each address type clearly.
2. Provide Relevant Descriptions – Add a brief description to clarify the purpose of each address type.
3. Add Comments When Necessary – Use the comments field for additional context or notes about the address type.
4. Organize Systematically – Maintain consistent naming and categorization to make addresses easy to track and manage.
5. Review Regularly – Periodically update address types to ensure they remain accurate and relevant.
Relationship Types
Classifications used to define and manage the nature of relationships between contacts, accounts, or entities within a system. Clearly defining relationship types helps maintain organized records, supports accurate reporting, and facilitates better communication and workflow management.
- Ensures that interactions between contacts and entities are properly categorized, enhances data organization, and supports efficient management and reporting of relationships within the system.
When adding or editing a Relationship Type, you typically fill out the following fields:
- Name – Enter a clear and descriptive title for the relationship type.
- Description – Provide a brief explanation of the relationship type’s purpose or context, highlighting its role within the system.
- Comments – Include any additional notes or relevant information to help users understand the relationship type and its proper use.
- Save Relationship Type – Click this button to confirm and store the relationship type information in the system.
Please find attached the video for the Relationship Types.
Follow these Steps to navigate and use Relationship Types:
1. Click "Administrative Task"
2. Click "Relationship Types"
3. Click "New Relationship Type"
4. Enter the desired name for the new Relationship type.
5. Add a Description if desired
6. Add Comments if desired
7. Click "Save Relationship Type"
Please find the link to the Step-By-Step reference guide for Relationship Types. Relationship Types.png
✅ Tips for Relationship Types:
1. Use Clear and Descriptive Names – Ensure each relationship type clearly reflects the connection.
2. Provide Meaningful Descriptions – Add a brief description to clarify the purpose or role of each relationship type.
3. Include Comments When Necessary – Use the comments field for additional context, guidelines, or special instructions.
4. Maintain Consistency – Apply standardized naming conventions to avoid confusion and ensure accurate reporting.
5. Review Regularly – Periodically evaluate relationship types to ensure they remain relevant and aligned with current workflows.
6. Leverage for Automation and Workflow – Assign responsibilities or workflows based on relationship types to streamline processes.
Membership Types
Are categories used to define and manage different levels or classifications of memberships within a system. These types help organize members based on their privileges, duration, status, or benefits, making it easier to track and maintain membership records effectively.
When adding or editing a Membership Type, you typically complete the following fields:
- Name – Enter a clear and descriptive title for the membership type.
- Description – Provide a brief explanation outlining the purpose, benefits, or conditions associated with this membership type.
- Comments – Include any additional notes or relevant information to assist users in understanding or managing this membership type.
- Save Membership Type – Click this button to confirm and store the membership type information in the system.
Please find attached the video for the Membership Types.
Follow these Steps to navigate and use Membership Types:
1. Click "Administrative Task"
2. Click "Membership Types"
3. Click "New Membership Type"
4. Enter the desired name for the new Membership type.
5. Add a Description if desired
6. Add Comments if desired
7. Click "Save Membership Type"
Please find the link to the Step-By-Step reference guide for Membership Types. Membership Types.png
✅ Tips for Membership Types:
1. Use Clear and Consistent Names – Choose straightforward and recognizable names (e.g., “Basic,” “Premium,” “Corporate”) to make each membership type easy to identify.
2. Provide Detailed Descriptions – Clearly explain what each membership type includes, such as benefits, duration, or eligibility requirements.
3. Utilize the Comments Field – Add any additional notes, renewal conditions, or internal guidelines that help clarify membership management.
4. Maintain Consistency Across the System – Apply standardized naming and formatting to avoid confusion and ensure accurate tracking.
5. Review and Update Regularly – Periodically revisit membership types to ensure they align with current policies, offerings, and member needs.
6. Align with Organizational Goals – Design membership types that reflect your organization’s structure, services, and customer engagement strategy.
7. Leverage for Reporting and Analytics – Use membership types to generate insights on member distribution, retention, and growth trends.
Preference Types
Classifications used to define and organize different kinds of user or system preferences within a platform. They help in customizing user experiences, managing settings, and standardizing configurable options based on organizational needs. Clearly defining preference types ensures consistency, clarity, and efficiency in managing user settings or preferences.
When adding or editing a Preference Type, you typically complete the following fields:
- Preference Type Name – Enter a clear and descriptive name for the preference type (e.g., “Notification Settings,” “Language Preference,” “Theme Selection”).
- Parent – Select the parent category under which the preference type belongs, if applicable. This helps in grouping related preferences for easier management.
- Description – Provide a brief explanation of the purpose or function of the preference type to ensure clarity for users and administrators.
- Save Preference Type – Click this button to confirm and store the preference type details in the system.
Please find attached the video for the Preference Types.
Follow these Steps to navigate and use Preference Types:
1. Click "Administrative Task"
2. Click "Preference Types"
3. Click "New Membership Type"
4. Enter the desired “Preference Type Name”
5. Enter/Choose the desired “Parent”
6. Add a Description if desired
7. Click "Save Preference Type"
Please find the link to the Step-By-Step reference guide for Preference Types. Preference Types.png
✅ Tips for Preference Types:
1. Use Clear and Descriptive Names – Choose names that clearly indicate the purpose of the preference (e.g., “Email Notifications,” “Language Settings”).
2. Organize with Parent Categories – Group related preferences under appropriate parent categories to keep settings structured and easy to manage.
3. Provide Concise Descriptions – Clearly describe what each preference type controls or affects to help users understand its function.
4. Maintain Consistency – Follow a standard naming and formatting convention to ensure uniformity across all preference types.
5. Review and Update Regularly – Periodically check preference types to ensure they remain relevant and aligned with current user needs and system updates.
6. Simplify User Experience – Create preference types that make configuration intuitive and reduce user confusion.
Maintenance Types
Are classifications used to organize and manage various maintenance activities within an organization. Each type includes essential details to ensure proper tracking, planning, and execution of maintenance tasks.
When adding or editing a Maintenance Type, you are required to complete the following fields:
-
Name – Enter a clear and descriptive title for the maintenance type.
-
Description – Provide a concise explanation of the maintenance type’s purpose or context, outlining its role within the system or maintenance process.
-
Comments – Add any relevant notes, instructions, or additional information that will help users understand how and when this maintenance type should be applied.
-
Save Maintenance Type – Click this button to confirm and store the maintenance type details in the system.
Please find attached the video for the Maintenance Types.
Follow these Steps to navigate and use Maintenance Types:
1. Click "Administrative Task"
2. Click "Maintenance Types"
3. Click "New Maintenance Type"
4. Enter the desired “Maintenance Type Name”
5. Add a Description if desired
6. Click "Save Maintenance Type"
Please find the link to the Step-By-Step reference guide for Preference Types. Maintenance Types.pdf
✅ Tips for Maintenance Types:
-
Use clear and consistent naming conventions.
Choose descriptive names that make it easy for users to identify the purpose of each maintenance type (e.g., Preventive – Equipment Check rather than just Check). -
Provide concise but informative descriptions.
Summarize what the maintenance type is used for and when it should be applied. Avoid overly technical jargon unless necessary. -
Add helpful comments for context.
Use the comments field to include special notes, procedures, or reminders that can guide users in selecting the correct maintenance type. -
Review and update regularly.
Periodically check maintenance types to ensure they remain relevant to current operations, standards, and equipment needs.
Pet Types
Allows users to define and manage standardized categories of animals within the system. This ensures consistency and accuracy across pet-related records such as registration, medical history, and reporting.
When adding or editing a Pet Types, you are required to complete the following fields:
-
Name – Enter a clear and descriptive title for the pet type (e.g., Dog, Cat, Bird).
-
Description – Provide a concise overview of the pet type, highlighting key traits or context (e.g., “Domesticated canine species commonly kept for companionship and security”).
-
Comments – Include any additional notes, care instructions, or special considerations to guide users on proper use.
-
Save Pet Type – Click this button to confirm and store the pet type details in the system. Once saved, the new or updated pet type will be available across relevant modules.
Please find attached the video for the Pet Types.
Follow these Steps to navigate and use Pet Types:
1. Click "Administrative Task"
2. Click "Pet Types"
3. Click "New Pet Type"
4. Enter the desired “Pet Type Name”
5. Add a Description if desired
6. Click "Save Pet Type"
Please find the link to the Step-By-Step reference guide for Pet Types. Pet Types.pdf
✅ Tips for Pet Types:
-
Use clear and consistent names for each pet type to make searching and categorization easier (e.g., Dog – Small Breed, Dog – Large Breed).
-
Provide concise and informative descriptions that clearly explain the pet type’s characteristics or purpose.
-
Include helpful notes in the Comments field, such as care instructions, medical reminders, or documentation guidance.
-
Review and update regularly to ensure pet type information remains accurate and relevant.
-
Avoid duplicates by checking existing entries before creating a new pet type.
-
Ensure all new or updated pet types are saved properly using the Save Pet Type button so they are available in all relevant modules.
Department Types
Used to categorize and manage organizational units within the system. Proper configuration ensures consistency in workflow assignments, reporting, and overall organizational management.
When adding or editing a Department Types, you are required to complete the following fields:
-
Name – Enter a clear and descriptive title for the department type to ensure easy identification.
Example: Human Resources, Finance, IT Support, Operations -
Description – Provide a concise explanation of the department’s function, scope, and responsibilities.
Example: The Human Resources department oversees recruitment, employee relations, and training programs. -
Comments – Include any additional notes, internal procedures, or special instructions to assist users.
Example: HR handles onboarding, performance appraisals, and employee benefits. -
Save Department Type – Click this button to confirm and store the department type. Once saved, it will be available for assignment across all relevant modules.
Please find attached the video for the Department Types.
Follow these Steps to navigate and use Department Types:
1. Click "Administrative Task"
2. Click "Department Types"
3. Click "New Department Type"
4. Enter the desired “Department Type Name”
5. Add a Description if desired
6. Click "Save Department Type"
Please find the link to the Step-By-Step reference guide for Department Types. Department Types.pdf
✅ Tips for Department Types:
-
Use clear and consistent names to ensure departments are easily identifiable (e.g., Finance – Accounts Payable, Finance – Accounts Receivable).
-
Provide concise and informative descriptions that clearly define each department’s responsibilities and scope.
-
Include helpful notes in the Comments field for internal procedures, workflow instructions, or special considerations.
-
Review and update periodically to reflect organizational changes or updated responsibilities.
Location Types
Helps standardize data entry, streamline workflows, improve reporting accuracy, and facilitate operational management, identify the role of a location within the organization, such as whether it is used for storage, operations, customer service, or administrative purposes and provides clarity for auditing, safety, and regulatory purposes.
When adding or editing a Location Type, you typically fill out the following fields:
-
Name – Enter a clear and descriptive title for the location type to make it easily identifiable.
Example: Warehouse, Office, Retail Store, Distribution Center -
Description – Provide a concise explanation of the location type, including its purpose and role within the organization.
Example: Warehouse locations are designated for storage and inventory management of goods. -
Comments – Include any additional notes, internal instructions, or relevant information to guide users in properly applying the location type.
Example: Retail Stores require regular inventory audits and customer service monitoring. -
Save Location Type – Click this button to confirm and store the location type. Once saved, it will be available for selection across relevant modules and workflows.
Please find attached the video for the Location Types.
Follow these Steps to navigate and use Location Types:
1. Click "Administrative Task"
2. Click "Location Types"
3. Click "New Location Type"
4. Enter the desired “Location Type Name”
5. Add a Description if desired
6. Add a Comment if desired
7. Click "Save Location Type"
Please find the link to the Step-By-Step reference guide for Location Types. Location Types.pdf
✅ Tips for Location Types:
-
Choose clear and descriptive names for each location type to ensure easy identification (e.g., Warehouse, Office, Retail Store).
-
Write meaningful descriptions that clearly convey the purpose and role of the location type within the organization.
-
Add relevant notes in the Comments field to provide guidance on special instructions, workflows, or internal procedures.
-
Ensure consistency across all entries to standardize data entry, minimize errors, and avoid confusion.
-
Regularly review and update location types to keep information accurate and aligned with operational or organizational changes.
Trade Types
Trade Types are predefined categories used to classify and organize the various skilled services or technical work required within the system. These classifications ensure that tasks, work orders, maintenance activities, and operational requests are routed to the appropriate personnel or departments.
Trade Types help maintain consistency, improve reporting accuracy, and streamline workflow assignment across all modules.
-
Provide a standardized list of skilled service categories
-
Ensure tasks are assigned to the correct trade or specialist
-
Support efficient maintenance and operational workflows
-
Improve clarity in reporting, analytics, and documentation
-
Help administrators manage and configure service-related tasks
The Trade Types section has been fully documented and refined with the following fields:
-
Name – Specifies the official title of the Trade Type for accurate identification and selection across the system.
-
Description – Provides a clear explanation of the trade’s purpose, scope, and activities to ensure consistent understanding among users.
-
Comments – Allows the addition of any relevant notes, instructions, or internal remarks to support clarity and communication.
-
Save Trade Type – Confirms and records the new or updated Trade Type in the system, making it available for use in related modules.
Please find attached the video for the Trade Types.
Follow these Steps to navigate and use Trade Types: Trade Types.pdf
1. Click "Administrative Task"
2. Click "Trade Types"
3. Click "New Trade Type"
4. Enter the desired “Trade Type Name”
5. Add a Description if desired
6. Add a Comment if desired
7. Click "Save Trade Type"
✅ Tips for Trade Types:
-
Use clear and specific names
Choose trade names that are easy to recognize (e.g., Electrical, Plumbing, HVAC) to ensure quick and accurate task assignment. -
Provide concise but meaningful descriptions
Keep descriptions focused on the trade’s responsibilities so users understand when each trade should be selected. -
Avoid duplicate or overlapping trade categories
Ensure each trade is unique to prevent confusion and maintain clean reporting. -
Use the Comments field for internal notes
Add instructions, exceptions, or workflow notes to help teams understand special requirements for a specific trade. -
Review trade types periodically
Update or refine trade types as your operations evolve, ensuring they remain accurate and relevant. -
Align trade types with workflows
Make sure they match your maintenance or service processes so the correct personnel receive the correct tasks. -
Test after adding new trade types
Verify that new trades appear correctly in work orders, filters, and reports before finalizing. -
Ensure access control is in place
Allow only authorized users (admins) to add, edit, or remove trade types to maintain data integrity.
Warranty Status
The Warranty Status section allows administrators to define and manage the different statuses used to track warranty requests, warranty claims, and warranty-related processes. Clear status definitions ensure consistent reporting, smooth workflow transitions, and accurate communication between users, residents, and administrators.
When adding or editing a Warranty Status, you typically fill out the following fields:
- Color - Color coding helps users quickly identify the status of warranty requests, improving visibility, reducing errors, and speeding up workflow decisions. Each status is assigned a distinct color to represent its meaning at a glance.
-
Name – Identifies the specific warranty status (e.g., Pending, Approved, Completed). Used across all warranty modules for selection and reporting.
-
Description – Provides a detailed explanation of what the status represents to ensure proper usage throughout the warranty process.
-
Comments – Allows additional notes or internal instructions related to the status for improved clarity and communication.
-
Save Warranty Status – Finalizes and records the new or updated warranty status, making it available for system-wide use.
Please find attached the video for the Warranty Status.
Follow these Steps to navigate and use Warranty Status:
1. Click "Administrative Task"
2. Click "Warranty Status"
3. Click "New Warranty Status"
4. Assign a distinct color to each Warranty Status to facilitate quick and easy identification.
5. Enter the desired “Warranty Status Name”
6. Add a Description if desired
7. Add a Comment if desired
8. Click "Save Warranty Status"
✅ Tips for Warranty Status:
Unit Locations
The Unit Locations section is used to define, manage, and track the various physical or virtual units within a property, facility, or system. Properly defining unit locations ensures accurate recordkeeping, reporting, and assignment of tasks, assets, or responsibilities.
The Unit Locations section has been fully documented and refined with the following fields:
-
Name – Identifies the specific unit location (e.g., Building A – Floor 1 – Unit 101). This is used across all relevant modules for selection, reporting, and assignment purposes.
-
Description – Provides a detailed explanation of the unit location, including its type, purpose, or distinguishing characteristics, to ensure proper understanding and usage.
-
Comments – Allows additional notes or instructions related to the unit location, improving clarity and communication among users and administrators.
-
Save Unit Locations – Finalizes and records the new or updated unit location, making it available system-wide for use in asset management, maintenance, resident assignments, and reporting.
Please find attached the video for the Unit Locations.
Follow these Steps to navigate and use Unit Locations:
1. Click "Administrative Task"
2. Click "Unit Locations"
3. Click new "Unit Location"
4. Enter the desired “Unit Locations”
5. Add a Description if desired
6. Add a Comment if desired
7. Click "Save Unit Location"
Follow these Steps to navigate and use Unit Locations: Unit Locations.pdf
✅ Tips for Unit Locations:
-
Use clear and unique names
Assign names that clearly identify each unit location (e.g., Building A – Floor 1 – Unit 101) to avoid confusion. -
Provide detailed descriptions
Include relevant information such as unit type, purpose, size, or distinguishing features to ensure accurate understanding. -
Utilize the Comments field effectively
Add notes for special access instructions, maintenance requirements, occupancy restrictions, or other important details. -
Maintain consistency
Follow a standardized naming and description format across all units to improve searchability, reporting, and workflow assignment. -
Regularly review and update
Periodically verify that unit location details are accurate and reflect any changes in occupancy, layout, or usage. -
Validate before saving
Ensure all required fields are completed and that unit names are unique before saving to maintain data integrity. -
Integrate with workflows
Make sure unit locations are properly linked to related modules such as maintenance tasks, asset tracking, or resident management.
Referral Resources
The Referral Sources section allows administrators to define and manage the origins or channels through which clients, residents, or users are referred to the organization or system. Properly managing referral sources ensures accurate tracking, reporting, and analysis of marketing, outreach, and engagement efforts.
When adding or editing a Referral Sources, you typically fill out the following fields:
-
Name – Identifies the specific referral source (e.g., Online Advertisement, Friend Referral). This is used across all relevant modules for selection, reporting, and analytics.
-
Description – Provides a detailed explanation of the referral source, including context or purpose, to ensure proper usage and understanding.
-
Comments – Allows additional notes or internal instructions related to the referral source, improving clarity and communication among users and administrators.
-
Save Referral Source – Finalizes and records the new or updated referral source, making it available system-wide for use in intake, registration, and reporting processes.
Please find attached the video for the Referral Sources.
Follow these Steps to navigate and use Referral Sources:
1. Click "Administrative Task"
2. Click "Referral Sources"
3. Click new "Referral Source"
4. Enter the desired “Referral Source” Name
5. Add a Description if desired
6. Add a Comment if desired
7. Click "Save Referral Source"
Follow these Steps to navigate and use Referral Sources: Referral Sources.pdf
✅ Tips for Referral Sources:
-
Use clear and descriptive names
Assign names that clearly identify each referral source (e.g., Online Advertisement, Friend Referral, Social Media Campaign) to avoid confusion and ensure accurate tracking. -
Provide meaningful descriptions
Include context or details about the referral source to help users and administrators understand its purpose and origin. -
Leverage the Comments field
Use comments to add internal notes, special instructions, historical performance, or other relevant observations. -
Maintain consistency
Follow a standard naming and description format across all referral sources to improve reporting, analytics, and workflow integration. -
Validate before saving
Ensure all required fields are completed and that names are unique before saving to maintain data integrity. -
Review periodically
Regularly update referral sources to reflect new campaigns, channels, or changes in outreach strategy. -
Integrate with workflows
Make sure referral sources are correctly linked to intake forms, registration modules, and reporting tools for accurate data collection.
Sales Representatives
The Sales Representatives section allows administrators to define and manage individuals or teams responsible for driving sales, client engagement, and business development. Properly managing sales representatives ensures accurate assignment of leads, tracking of performance, and efficient reporting.
The Sales representatives section has been fully documented and refined with the following fields:
-
Name – Identifies the sales representative or team (e.g., John Doe, Jane Smith). This is used across all relevant modules for lead assignments, sales tracking, and reporting.
-
Description – Provides detailed information about the representative, such as role, territory, specialization, or responsibilities, to ensure proper usage and understanding.
-
Comments – Allows additional notes or internal instructions related to the sales representative, improving clarity and communication among users and administrators.
-
Save Sales Representatives – Finalizes and records the new or updated sales representative, making them available system-wide for lead assignments, performance tracking, and reporting.
Please find attached the video for the Sales Representatives.
Follow these Steps to navigate and use Sales Representatives:
1. Click "Administrative Task"
2. Click "Sales Representatives"
3. Click new "Sales Representative"
4. Enter the desired “Sales Representative” Name
5. Add a Description if desired
6. Add a Comment if desired
7. Click "Save Sales Representative"
Follow these Steps to navigate and use Sales Representatives: Sales Representatives.pdf
✅ Tips for Sales Representatives:
-
Use clear and complete names
Enter the full name of each sales representative (e.g., John Doe) to ensure accurate assignment, tracking, and reporting. -
Provide detailed descriptions
Include relevant details such as role, territory, specialization, or responsibilities to clarify each representative’s scope and accountability. -
Leverage the Comments field
Use comments for internal notes, special client instructions, performance highlights, or availability details. -
Maintain consistency
Follow a standardized naming and description format across all representatives for easier reporting and workflow integration. -
Validate before saving
Ensure all required fields are completed and that names are unique to maintain data integrity and avoid duplicates. -
Assign appropriately
Link sales representatives to the correct leads, territories, or modules to ensure proper workflow and accountability. -
Review periodically
Update information as needed to reflect changes in assignments, responsibilities, or personnel.
Ratings
The Ratings section allows administrators to define and manage evaluation or performance levels used across various modules, such as service quality, user feedback, employee performance, or asset condition. Clear definitions and proper usage of ratings ensure consistent assessment, reporting, and decision-making.
When adding or editing a Ratings, you typically fill out the following fields:
-
Name – Identifies the specific rating level (e.g., Excellent, Good, Fair, Poor). This is used across all relevant modules for selection, reporting, and analytics.
-
Description – Provides detailed information about what each rating represents, ensuring proper interpretation and consistent usage across the system.
-
Comments – Allows additional notes or internal instructions related to the rating, enhancing clarity and communication among users and administrators.
-
Save Rating – Finalizes and records the new or updated rating, making it available system-wide for all relevant evaluation and feedback modules.
Please find attached the video for the Ratings.
Follow these Steps to navigate and use Ratings:
1. Click "Administrative Task"
2. Click "Ratings"
3. Click new "Rating"
4. Enter the desired “Rating” Name
5. Add a Description if desired
6. Add a Comment if desired
7. Click "Save Rating"
Follow these Steps to navigate and use Ratings: Ratings.pdf
✅ Tips for Ratings:
-
Define ratings clearly
Ensure each rating has a distinct name and meaning (e.g., Excellent, Good, Average, Poor) to avoid ambiguity. -
Provide contextual descriptions
Describe what each rating represents to guide users in selecting the appropriate level consistently. -
Use comments for clarity
Include additional notes or examples in the Comments field to support evaluators and internal teams. -
Maintain consistency across modules
Apply the same rating system throughout all relevant areas, such as performance, feedback, or quality checks, for uniform reporting.
Reports
Quick Reports
Templates
Contacts Report Type
Creating Residents List
Adding Report Filter
Using Multiple Filters
Order and Grouping
Activities
Activities
Providing clear and detailed information about available activities enables guests to make informed choices, enhances their engagement, and ensures a more enjoyable and organized stay. This section also promotes the facility’s offerings and can improve overall guest satisfaction.
Please find attached the video for the Activities.
- All Activities - You can view all activity names, statuses, and logged dates. Additionally, you can also view and update activities as needed by clicking the three-dot icon under "Actions."
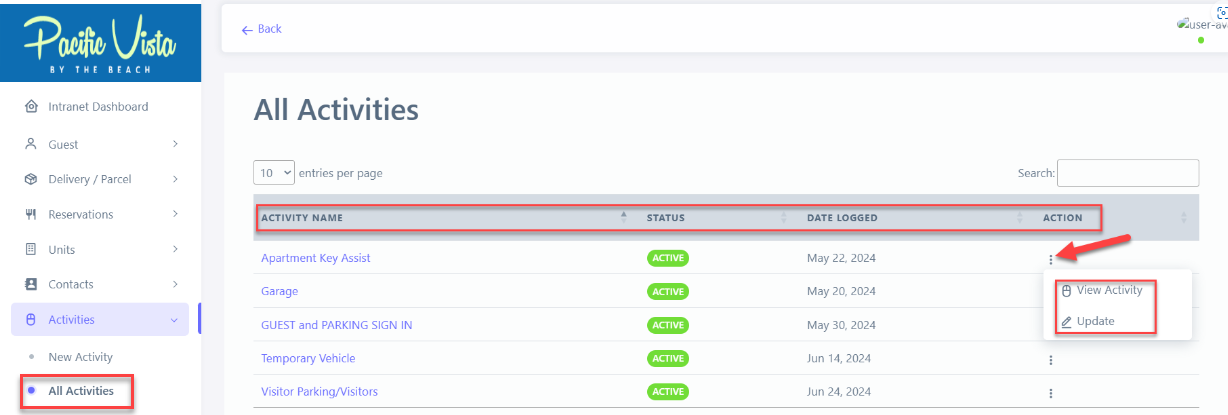
Watch the Comprehensive Step-by-Step Instructions on "Activities".
Follow these Steps to Activities.:
- Click "Activities"
- Click "New Activity"
- Click "Activity Type" choose from the list the activity type that you want.
- Go to "Origin" option list, choose from there.
- Choose the appropriate "Recipient Unit".
- Kindly provide your desired "Comments"
- Select the desired "Person Responsible"
- Type in the correct "Phone #".
- Type in the "Quantity"
- Enter the correct "Duration Start" and "Duration End".
- Click here "Specific date"
- Click the desired "Date" and Click "Done"
- Click "Save Activity"
Please find the link to the Capture Step-By-Step reference guide for Activities. Activities pdf.pdf
✅ Tips for Creating Effective Activities:
- Define Objectives
Know the purpose of the activity and desired outcomes - Give Clear Instructions
Ensure participants understand what to do and expected results.