CEOneSource Domain Mapping
Download: DNS_Update_Instructions_CE_OneSource.docx version1
Updating Your DNS to Point to CE OneSource
CNAME Setup and Root (Apex) Domain Redirect
Overview
Your website is hosted on the CE OneSource platform. To make your domain display the content hosted on CE OneSource, a small change is required at your DNS provider — the company that manages your domain name (for example, GoDaddy, Namecheap, Cloudflare, or your web host).
This document has two parts. Part 1 explains how to add a CNAME record so that www.yourdomain.com points to www.ceonesource.com. Part 2 explains how to redirect your bare “root” domain (for example, yourdomain.com with no www) over to the www address. Generic steps are given first, followed by GoDaddy-specific steps with illustrative screen examples.
Part 1 — Add the “www” CNAME Record
Record Values
Enter the following values when creating the new DNS record. The field labels differ slightly between providers, so common alternate names are shown.
|
Field |
Value |
|
Type |
CNAME |
|
Name / Host / Alias |
www |
|
Value / Points To / Target |
www.ceonesource.com |
|
TTL |
Automatic (or 3600 / 1 hour) |
|
Note: Some providers automatically add your domain to the host name. If you see www.yourdomain.com appear after you type www, that is correct — only enter www in the host field. |
Generic Step-by-Step Instructions
1. Sign in to your DNS provider. Log in to the account where your domain is registered or where its DNS is managed.
2. Open the DNS management area. Look for a section labeled “DNS,” “DNS Management,” “DNS Settings,” or “Zone Editor.”
3. Add a new record. In the records list, choose “Add,” “Add Record,” or “Add New Record.”
4. Select the record type. Choose CNAME from the type menu.
5. Enter the host name. In the “Name,” “Host,” or “Alias” field, type www.
6. Enter the destination. In the “Value,” “Points To,” or “Target” field, type www.ceonesource.com.
7. Set the TTL (if shown). Leave it on the default or “Automatic.”
8. Save the record. Click “Save,” “Add,” or “Confirm.”
GoDaddy-Specific Instructions (if you use GoDaddy)
If your domain is managed at GoDaddy, follow these steps. The screens below are illustrative examples — GoDaddy updates its interface periodically, so your screen may look slightly different, but the field names and values are the same.
1. Sign in to your GoDaddy account at godaddy.com.
2. Open the Domain Portfolio (also called “My Products”) and select your domain to open its Domain Settings page.
3. Select DNS (or Manage DNS) to view your DNS records.
4. Select Add New Record.
5. For Type, choose CNAME.
6. In the Name field, enter www.
7. In the Value field, enter www.ceonesource.com.
8. Leave TTL set to 1 Hour.
9. Select Save.
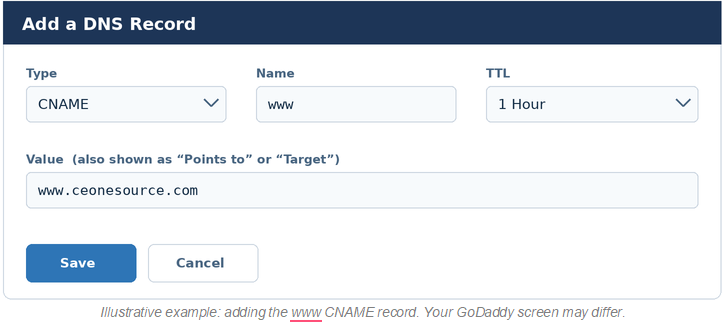
Illustrative example: adding the www CNAME record. Your GoDaddy screen may differ.
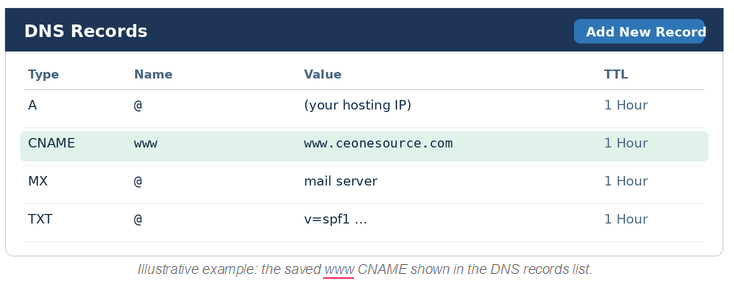
After saving, confirm the new record appears in your records list:
 .
.
|
GoDaddy tip: GoDaddy may automatically append your domain to values you enter. For the www record, enter only www in the Name field — do not type the full www.yourdomain.com. |
Verifying the CNAME
DNS changes usually take effect within an hour but can take up to 24–48 hours to update everywhere (“propagation”). To confirm:
• Wait at least 15–30 minutes after saving.
• Visit www.yourdomain.com in a browser to confirm it loads your CE OneSource site.
• Optionally, use a free “CNAME lookup” or “DNS checker” tool to confirm www resolves to www.ceonesource.com.
Part 2 — Redirect the Root (Apex) Domain to www
The root or apex domain is your bare domain with no prefix — for example yourdomain.com instead of www.yourdomain.com. You will usually want visitors who type the bare domain to land on the www version that you set up in Part 1.
Why the apex needs special handling: The DNS standard does not allow a CNAME record on the apex when other records (such as MX for email) also exist there — and they almost always do. So you cannot simply point @ to www.ceonesource.com with a CNAME. There are two supported ways to handle this:
The Two Methods at a Glance
|
Method |
What it does |
Use when |
|
HTTP/HTTPS redirect (“forwarding,” 301) |
Sends the bare domain to www; the address bar changes to the www URL. |
Your provider offers domain forwarding with HTTPS. Makes www the single canonical address. |
|
ALIAS / ANAME (or CNAME flattening) |
Lets the apex resolve directly to a hostname. The address bar stays on the bare domain (no redirect). |
You use a modern DNS provider that supports apex aliasing (e.g. Cloudflare, Route 53, DNSimple, Namecheap). |
|
Important distinction: A redirect changes the visitor’s address bar to www. An ALIAS/ANAME record does not redirect — it just makes the bare domain resolve to the target. If your goal is for everyone to end up on www, the redirect method is the most direct. ALIAS/ANAME is the right choice if your provider supports it and you prefer the apex to serve the site without a visible redirect. |
Method A — HTTP/HTTPS Redirect (Generic)
Most registrars call this “domain forwarding.” Configure it as follows:
• Forward from: your bare domain, yourdomain.com.
• Forward to: https://www.yourdomain.com.
• Type: Permanent (301) — best for search-engine consolidation.
• HTTPS/SSL: enable the “forward over HTTPS” or “include SSL” option so that both http:// and https:// requests are redirected securely. This is essential — without it, visitors arriving at https://yourdomain.com may see a security warning.
Do not use “forwarding with masking” — it hides the real URL and is not recommended for SEO.
Method B — ALIAS / ANAME / CNAME Flattening (Generic, Modern DNS)
If you use a modern DNS provider that supports apex aliasing, you can point the bare domain straight at the platform instead of (or in addition to) a redirect:
• Type: ALIAS, ANAME, or a flattened CNAME (the label varies by provider).
• Name / Host: @ (the root).
• Value / Target: www.ceonesource.com.
Provider examples: Cloudflare offers automatic “CNAME flattening” at the apex; Amazon Route 53 uses “ALIAS” records; DNSimple and Namecheap offer “ALIAS/ANAME.” If you want the address bar to still consolidate on www, combine this with a redirect rule at your provider or platform.
GoDaddy-Specific Instructions for the Apex Redirect
GoDaddy does not support ALIAS or ANAME records, so Method B is not available there. Use GoDaddy’s built-in domain forwarding (Method A) instead:
1. Sign in to GoDaddy and open your domain’s Domain Settings page.
2. Find the Forwarding section and select Add Forwarding (under the Domain area).
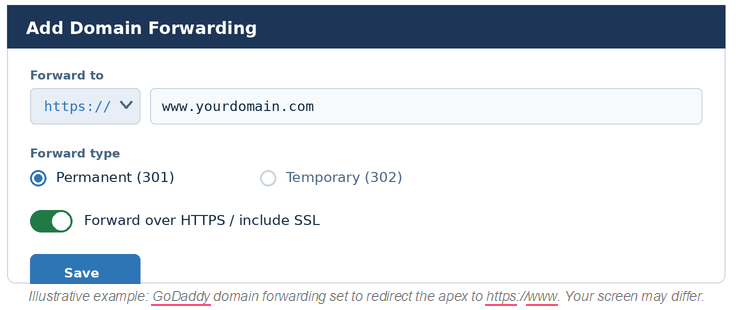
3. Set the destination to https://www.yourdomain.com.
4. Choose forward type Permanent (301).
5. Enable the HTTPS / SSL option if shown, so secure requests are also forwarded.
6. Select Save.
|
Heads-up on GoDaddy + HTTPS: GoDaddy’s built-in forwarding has historically had limited HTTPS support for the secure version of the bare domain. If https://yourdomain.com does not redirect cleanly after forwarding is set, the reliable fix is to manage the domain’s DNS through a provider with proper HTTPS apex redirects or CNAME flattening (Cloudflare’s free tier is commonly used for this), then point a 301 redirect rule from the apex to www. Your CE OneSource representative can advise on this. |
Verifying the Redirect
• After 15–30 minutes, type yourdomain.com (no www) in a browser and confirm it lands on www.yourdomain.com.
• Repeat with https://yourdomain.com to confirm the secure version also redirects without a warning.
Need Help?
If you are unsure where to make these changes, or your provider’s screens look different from these examples, contact your CE OneSource representative. Please have your domain name and your DNS provider login details ready before reaching out.